How to Leverage the HeadSpin REST APIs in Your Appium Script
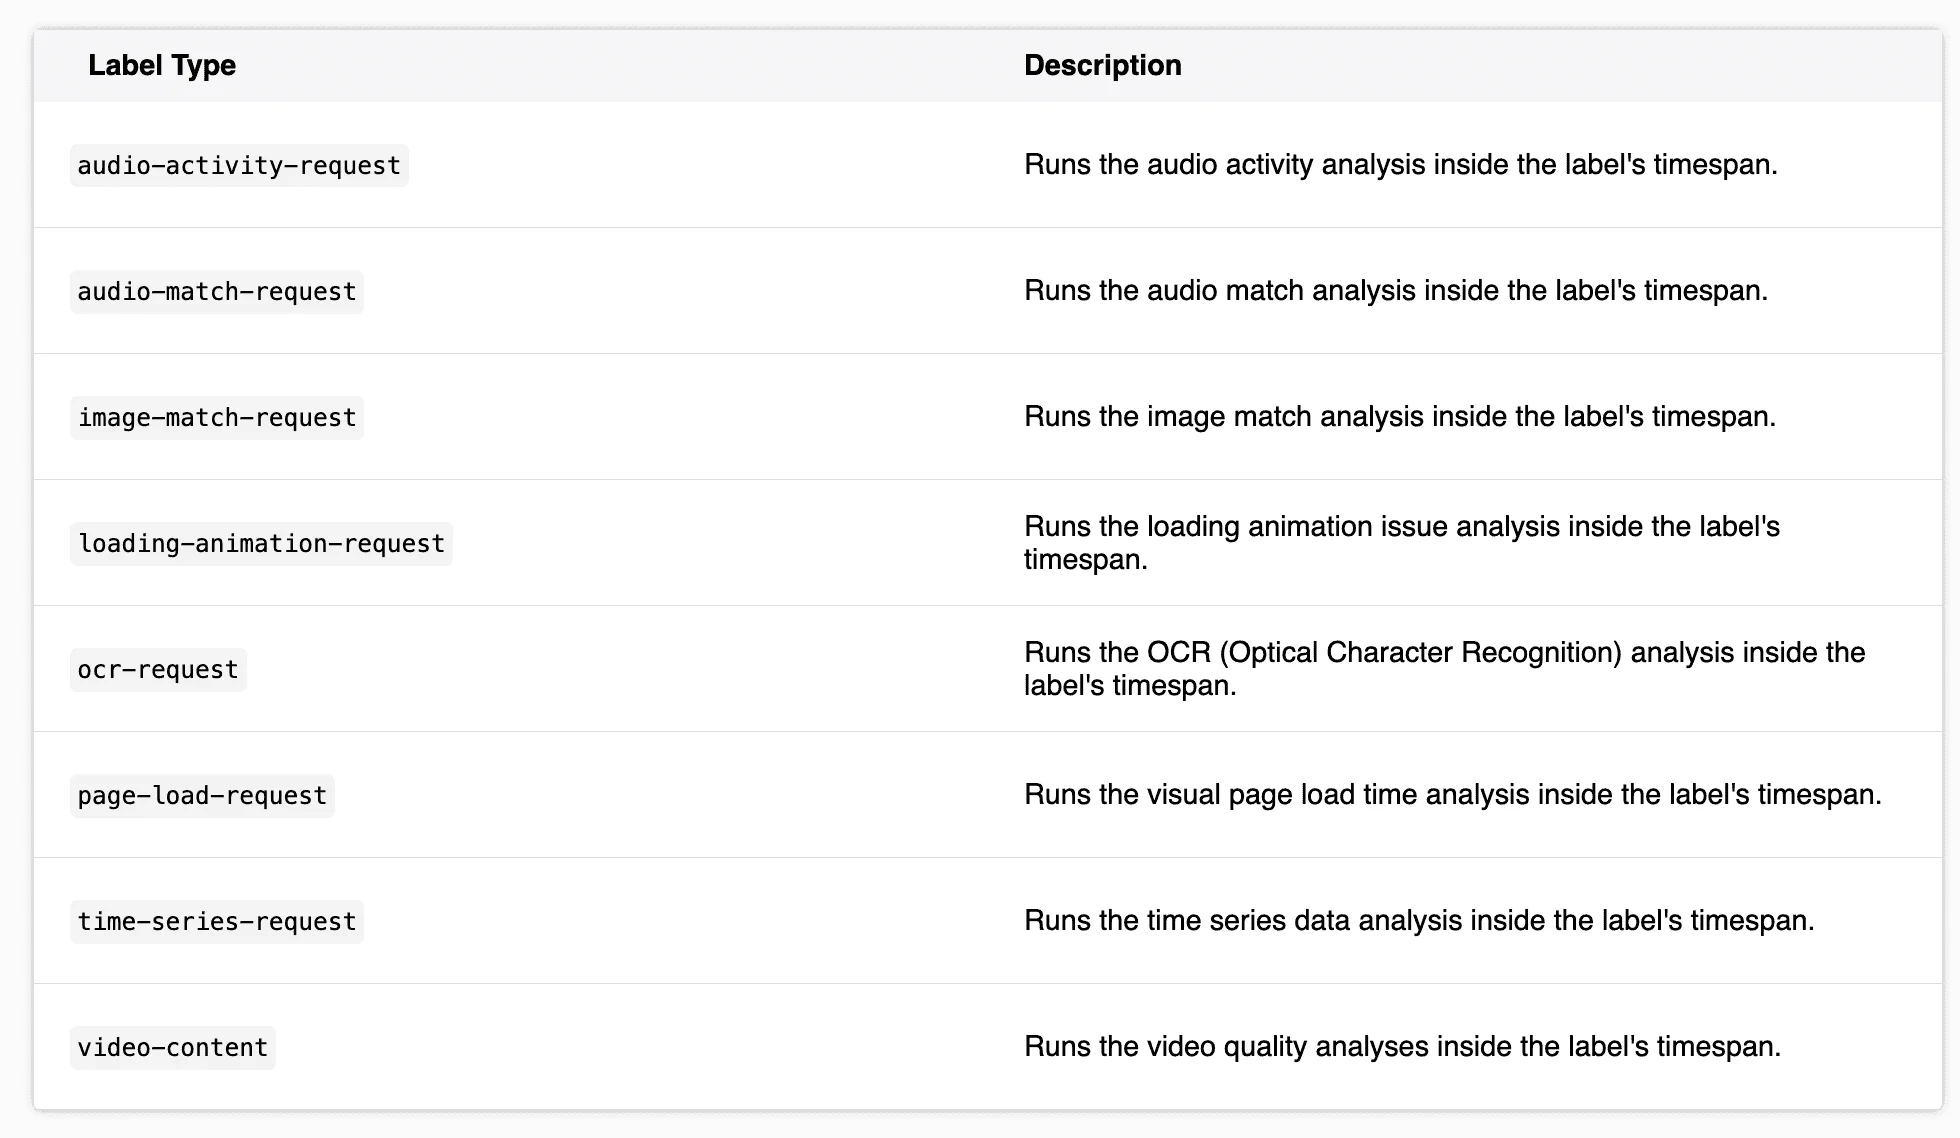
Comprehensive REST APIs One question that frequently arises is how to harness the capableness of HeadSpin API calls within an Appium script. In this blog post, we & # x27; ll explore the agency you can tap into the robust features and adaptability proffer by the HeadSpin API to elevate the effectiveness of your Appium scripts. HeadSpin swash the industry & # x27; s near comprehensive collection of REST API calls, offering a rich spectrum of functionalities crucial for enhancing your Appium scripts. These API yell are divided into three primary categories: Application APIs, Device APIs, and the unequalled Session APIs, single to HeadSpin. What incisively is a HeadSpin Session? It & # x27; s a transcription charm the actions on a device while executing your Appium book, ably termed a Performance Session. With HeadSpin & # x27; s expansive scope of API telephone, you can delve deep into these sessions, querying and analyzing them to gain profound insights into your examination execution. Incorporating these API calls into your playscript enables you to seamlessly upload applications, establish them on device (while removing any previous variation), dynamically select device for testing during execution, and meticulously scrutinise your recorded Performance Sessions. This integrating importantly amplifies the capacity of your script, empowering you with unparalleled control and apprehension. To commence harnessing API name within an Appium playscript, you & # x27; ll maiden require an Appium customer. Throughout this blog, I & # x27; ll provide model in Python. However, you can well adapt these shout to the programming language you & # x27; re utilizing for your Appium client, be it Java, Ruby, C #, or others. Furthermore, to experiment with these calls in your scripts, you & # x27; ll want a valid HeadSpin account. With the extensive tractableness volunteer by HeadSpin APIs, determining the most effective workflow becomes important. One conclusion to make is how to install the application on the device for test purposes. A popular approach involves utilise a CI/CD tool like Jenkins, as sketch in detail in our blog berth. This method involves installing the application severally from your Appium handwriting. Alternatively, you could opt to upload and install the application within the Appium script itself. Traditional Appium scripts necessitate knowing the specific device for test execution, as device values must be specified in the Desired Capabilities. But what if you postulate greater tractableness, such as dynamically selecting device during test execution? This is where the HeadSpin Device APIs come into play, render the capability to view available devices and take one at runtime. Additionally, the HeadSpin Appium Load Balancer offers a dynamic device option lineament, which we & # x27; ll delve into later. When it comes to the Session APIs, it & # x27; s essential to mold which ones will proffer the most value to your organization. One option is create session labels, a topic we & # x27; ll explore further in the Session APIs section. How do you get get? First, you need to make sure you have your HeadSpin API Token return. To generate your API Token, login to your HeadSpin report and dog on your name in the top right corner of the screen: Then click onSettings: Then, if there is no API Token already generated, you can click on+ New Tokento generate a new one: But what is yet better, HeadSpin aid you with your API calls by already including your API Token in the API examples in the corroboration. If you go to the API Reference corroboration here without logging in first, you will see the exemplar API calls with a variable for the API Token called& lt; your_api_token & gt;: However, if you are logged into your HeadSpin account, the API Token value is automatically filled in: This make it extremely easy to copy and paste these commands into a bid prompt for your API calls. However, we want to accomplish these calls in an Appium script, not by using gyre, so we need to create these API calls properly and in the correct format. If you are unsure how to convert a curl bidding to your preferred language, there are a bit of curl converter sites that you can observe online. The HeadSpin API uses a Bearer Token for authentication, and this means that you will use your HeadSpin API Token as the Bearer Token. It ’ s easy to just put that value in a variable so that it ’ s easy to use it throughout your script. Here ’ s an example (as a admonisher, all examples are in Python): For Python, you ’ ll motivation to import a library to make API calls, and use therequests library: The general format for a REST API shout is: The api_endpoint’ is the API URL to be used in the request, and you will notice how we ’ ve set the‘headers’to use the Bearer Token, which is the‘ auth_token’ value specified earlier. There is another element that you will need to use in a number of your API calls, and that is specifying some data that ’ s required for that API call. In that case, just create the appropriate object (be itjson, argument, or data) and include it in the request. In this exemplar, I am creating ajsonobject to set the status of the current session: And then I reference that object in my API call, like this: You can get a head start by reviewing the documentation on the HeadSpin API Reference. As you can see, there are a number of API category with the API call listed below. For example, this is a lean of API calls within the Session API section. Let ’ s see how we can leverage these APIs in our Appium playscript. To start with, we need to upload the application to the HeadSpin program and then find a device to install it on. Let ’ s discuss the Application APIs firstly, then we ’ ll talk about the Device APIs. There are a number of method you can use to upload your coating to the HeadSpin platform and/or install it on a device. For example, as stated before, you could leverage your CI/CD tool to upload the application and then establish it on a gimmick. Additionally, Appium can specify the application file within the script itself to instal on a device. These are all valid. However, I need to illustrate how you can also do all of these step utilizing the HeadSpin APIs within your Appium book. The advantage of uploading your application to the HeadSpin platform (the assumption here is that you get admittance to the .apk or .ipa file) is the file is only uploaded once, and then it ’ s installed onto the devices directly from the HeadSpin program. This method can offer grand savings on time and web traffic, count on how large your application is. Additionally, when uploading to the HeadSpin platform, you can assign a metadata selector value to the coating. What ’ s a metadata chooser? It ’ s a way of unambiguously identifying the application, similar to label. In fact, there are 17 metadata selectors that can unambiguously identify the uploaded application. You can consider those selectors on the Application Management documentation page here. Some chooser are automatically derived from the coating itself, like theapp_identifier, while others are user-provided, likebuild_type or version_tag. This gives you the flexibility to install an application onto a device based on the specific metadata picker. What is the HeadSpin API to upload an application? In the documentation, name here, the example is: The reason we need to use the -F alternative for this scroll dictation is that this is a multipart/form-data request, as explained in the documentation: As you can see, you have the option to add the metadata selector values to be assigned to the application. Once uploaded, the returned value is the uniqueapp_idfor that uploaded application. However, this upload command format is in curl, but we postulate to do it in a Python script. I can make the request like this: In my script, I like to put the API endpoint URL in a variable: To do a multipart/form-data request in Python, we need to create a ‘files’object. This is an example of the application that I want to upload. Then you can make the request: To add values for the metadata selectors, just add the selector and its value in the file object: You could easily add an additionalselector: valuepairs within the brackets {} Why would you want to add a metadata selector? It provides a method to query or install an application based on that metadata selector value. We ’ ll cover this in a little more detail when we install the application on a gimmick. This petition will return a jsonobject that contains the HeadSpinapp_idfor the uploaded covering. You will need this value afterwards in your script, so you ’ ll desire to store it in a variable. The stairs to do this are to convert thejsonobject to a textbook object and then retrieve theapp_id value. Now that the application has been uploaded to the, it ’ s clip to establish it on a HeadSpin device. There are a number of ways to do this task, so it will depend on your preferred workflow process. I will spotlight a few, but I will focus on leverage the HeadSpin API to find and select a device (or multiple device) to instal the application. First, you can precisely explicitly province the specific device to use for the exam. You simply add the udid/serial # within the Desired Capabilities (and other needed values). Here ’ s an example: Alternatively, you have the option to dynamically choose a device at test execution clip. There are two slipway to do this. We ’ ll talk about the simpler method firstly, but I ask to provide a small background information on the HeadSpin architecture. Each HeadSpin device is join to a server that contains an Appium Server that service that gimmick, up to eight devices per server. As a result, there could be differing Appium Server URLs that you would need to use for multiple devices. For example, the two devices below, both Android, are connected to different host within my organisation: The Appium WebDriver URL for the Google Pixel 4L is: And the Appium WebDriver URL for the Samsung S22 is: These are the value you use when make yourdriverobject (notice that your API Token is included in the URL which is why you handily don ’ t need to have a HeadSpin Username & amp; Password to create a session). As you can see, the values are different because of the different server names. You would need to specify each of these value whenever you want to test on these devices. To aid palliate this situation, HeadSpin has what ’ s known as the Appium Load Balancer (ALB). You can find the corroboration here. In a nutshell, it provides a single WebDriver URL to use for all of your devices. For exemplar, the two devices supra could each use this WebDriver URL value: Using this Appium Load Balancer URL channel, ALL Appium commands are sent through a single point, and then the dictation is forward to the corresponding device. An extra advantage is that you can use a twist metadata selector in the Desired Capabilities and let the Appium Load Balancer cull the first gimmick that matches the selector value. If you place this value in your Desired Capabilities: The Appium Load Balancer will select the very first usable device which is a Galaxy S22, and execute the test on that device. This gives you flexibility to not have to feature a specific device fix in your hand. However, by using the Appium Load Balancer, an additional layer is added during the test execution. If you still require to dynamically choose your device and use the device-specific WebDriver URL, you necessitate to do that using the HeadSpin Device API. Let ’ s discourse how to achieve this method. There ’ s a HeadSpin API to list all of the device and info (you must include at least one device metadata selector in the request): SUSA automates exploratory testing with persona-driven behavior, catching bugs that scripted automation misses. There are two important values contain in the ‘information’ response that will let you know if a device is ready to use for testing. They aredevice_state and owner_email. There are 3 potential value fordevice_state: online, offline, and disconnected. Obviously, we are. Additionally, a device may be on-line, and it may be busy and locked by another user. When a device is in use, theowner_emailvalue is inhabit. When the device is not in use,owner_email is set to None. By using these chooser and filtering base on these values, you can create a fantastic sum of flexibleness in your device selection at test execution clip. And, if you ’ re expend a model, like TestNG, that allows you to wind out multiple test execution threads on multiple device simultaneously, then you can truly ramp up your test execution suite. This is a two-step process: Let ’ s lead that scroll request and convert it to Appium. First, we ’ ll create our API Endpoint URL. Since we don ’ t need ajsonobject for this request, we can only add the selectors within the URL. In this example, I am getting a list of all of the online Samsung devices with OS adaptation 12. I could surely specify that list down with additional selectors or, conversely, widen the tilt with fewer picker. Include thisapi_endpoint,and the request looks like this: The target ‘response’ is a jsonobject, so we need to convert it to atextaim and then tread through to bump all of the devices that haveowner_email = None. If you want to create a list of all of the devices that match your criteria, so you would exactly add each gimmick & # x27; s serial bit to a list to use subsequently. In Python, make a listing aim: Then, in the loop, add eachdevice_idto the inclination with: The final loop would look like this: You would take the value indevice_list [& lt; exponent & gt;]and use that in your Desired Capabilities to specify the device to use in your test. For example: Then you could use the device_list [] and either wind out thosedevice_idsto different test execution threads or use them to intertwine your tryout on each device consecutive. As I said, you get plentifulness of choices of how you want to construct your device list to use for testing. There is one more thing we ask to do with this device inclination. And that is to determine which Appium WebDriver URL to use. As I mentioned earlier, utilise the HeadSpin Appium Load Balancer Webdriver URL makes it easy, and it ’ s the same for each and every device. But this blog is all about using the HeadSpin API, so we are not going to take the leisurely path! No, we are move to get the specific WebDriver URL for each gimmick in our inclination. To do this, we are going to leverage the HeadSpin Automation Config APIs for this task. You can read the documentation hither. You can request the automation configuration info from any HeadSpin device. A sample curl command looks like this: This bid revert the mechanisation configuration information for every device in your organization. Luckily, as with the dictation to get the gimmick information, you can include selectors in your bidding to narrow down the selected device, for illustration: However, to use this method, there is one more information battlefield that we need to enchant when we take our devices. In addition to thedevice_id, we will likewise involve thedevice_address. Why would we need to keep thedevice_address? The return data set from the mechanization configuration is form found on the device address of the devices. So, putting it all together, our new summons is: Therefore, we would modify our device selection code snippet to too enamor the device addresses (in a list objective telephone device_address_list []), like this: Now that we have the gimmick id and the device address, let ’ s regain the appropriate WebDriver URL. We need to translate the automation configuration API call to your lyric of choice. As before, we need to set theapi_endpoint: In this example, we are retrieving the data for only one specific gimmick. You can sure use a selector that returns multiple devices, but for the purpose of this blog, we will just recover the automation configuration for this single gimmick. Load the json target to text: This is the data that ’ s returned: To retrieve thedevice_url, which is the WebDriver URL for this specific gimmick, you ’ ll need to found it off of the device_address and then place its & # x27;device_url’ value in a variable. As you can see in the returned datum, thedriver_urlvalue contain this value:{api_token}. Obviously, you ’ ll need to supercede this with your valid API Token. Python makes this an easy task using the ‘replace’ bid: Now my WebDriver URL has the correct information and is ready to use: I will use this value when creating my web driver: All right, now that we ’ ve utter about the APIs for uploading the application and select device, it ’ s clip to verbalize about establish the covering on the twist itself. We have discourse this previously, and I know there are other method to install the coating on the device, but I want to discuss how you can do it with the HeadSpin APIs. But before we get into that, should we make certain that the application doesn ’ t already exist on the device? Once we ’ ve selected a device for prove, as a subject of practice, I would like to make sure that the application has been deleted so that I can do a tonic install. Luckily, you can use a metadata selector in the Delete API request, the corroboration for that is here: Here ’ s an example of deleting an application on an Android device: At a minimum, you can use theapp_indentifierpicker in theapi_endpointand make a request as: Now that the application has been deleted, let ’ s install the correct one that needs to be tested. You have the selection of doing it in a few ways. First, you can install the application directly onto the device without uploading it to the HeadSpin platform. This might be beneficial if you require to do a flying test on that version of the application before uploading it to the HeadSpin platform. The disadvantage is that by installing the coating directly onto the device, each additional device would require an upload of the application, taking still more time and requiring more network resources. The second method is to establish the coating after upload it to the HeadSpin program. Not to confuse things, but yet after you upload the application to the HeadSpin program, you still have multiple slipway to install the application on the device. Did I mention that the HeadSpin platform is super flexible? 😁 Let ’ s go over installing the application directly on the device since the other method ply a lot more flexibility. For Android, create afilesobject with your application and then theapi_endpoint with the device_idyou wish to use from our list. For iOS, the api_endpoint is slightly different: Then fulfill the request: If the installation is successful, you will get: & lt; Response [200] & gt; This is a very expressed way of installing an coating on a device, and, as mentioned, if you are quiz on multiple devices, this method lead time and consumes net imagination. If you have uploaded the application apply the API mentioned originally, then you feature captured the uniqueapp_idfor that uploaded application. You feature the option of using a HeadSpin-specific Desired Capability,headspin: app.id, to use thatapp_id,and the coating will mechanically be installed on the device. The bonus of this method is that you do not have to specify the appPackage and appActivity (or bundleId for iOS) of the application in your Desired Capabilities. However, let ’ s go over how to leverage the APIs to install the application AFTER the coating has be upload to the HeadSpin Platform, as delineate earlier. Because you can upload multiple versions of the like covering to the HeadSpin program, you have the flexibility to select the appropriate one using the metadata picker. For example, for the application we uploaded previously, I could issue an install command to find the version of the application that hasversion_tag set to ver1. I don ’ t have to worry about delimit theapp_id; just use a selector. I could constantly use HeadSpin to install the modish uploaded version regardless of the metadata selector. This would ensure that you are always prove on the modish uploaded version of the application. Since you can experience different applications uploaded that can use the metadata selector and the same value, for model, there may be multiple applications that feature aversion_tagselector set tover1; you can (and should!) include theapp_identifierselector to explicitly specify the correct application to install. This is what we ’ ll do in our illustration. From the application I uploaded antecedently and set theversion_tag to ver1, hither ’ s how I would install it on the gimmick specified bydevice_list [0]: Again, it all depends upon your procedure flow. The crucial thing to remember is that the HeadSpin Platform can support you no matter what your process flow is. Now that the correct adaptation of the coating has been installed on the device, we can add the appropriate value in the Appium script. First, we can change the Desired Capabilities to use the device information contained in device_list: (NOTE: I added an extra capability called ‘headspin: capture’ and set it toTrue. This will tape the test execution and create a Performance Session. There are a number of HeadSpin-specific Desired Capabilities that you can use. The documentation for them is here. Second, use the value that we placed in webdriver_url in thedrivercreation statement, as shown previously. Then, you can commence your application test. Now let ’ s discuss how we can add those session queries and interrogations into our script to take advantage of the ability of the HeadSpin platform. As name in theIntroductionsection, HeadSpin has the ability to read your session and make what is known as a Performance Session. Each performance session has a unique ID that countenance you to not only interrogate that session but too compare one session to another. There are a figure of and on the HeadSpin site that go over these issue in greater detail. As a matter of fact, the blog locate goes over how to use the Session APIs both manually and in an automation script. You can also review the HeadSpin documentation on Performance Sessions here. There are three principal type of Session APIs: The Session APIs are mainly focused on managing the session, allowing you to see how many you get, deleting sessions, and early management-type tasks. We won ’ t be too focused on these shout for this blog. The Session Annotation APIs allow you to, as the name propose, comment a session with things like tags, name, description, etc, as a way to uniquely identify a session. There are also API calls that permit you to create labels on the session. What is a label? They are described in the documentation hither. Their purpose is primarily to allow you to create different types of questions about your session, for example, how long did a page take to lade (a page burden petition), did an audio clip tally what I was anticipate? (an audio lucifer request). We won ’ t go over every one of these in this blog, but we will point out how to add them to your script so that you can create as many as required to get a full discernment of how your application performed during the test. The Session Analysis APIs are rivet on allowing you to track the status of the Session Annotations that you created…for example, has the audio match analysis been discharge yet? You can say about these APIs hither. Similar to ourDecide On Your Process Flowdiscussion earlier, you ’ ll want to decide which annotation you need to include in your script. There ’ s no boundary on how many, but you ’ ll want to focus on those that are most meaningful to you and your organization. From the documentation here, this is the list of Session Labels that you can create: Most of these labels are time-based. For instance, thepage-load-requestcaptures how long a page take to fully load. In the session, you have to mark a start clip and an end time for the Analysis Engine to cognise the Start-Stop Boundaries within the session for the analysis. In your script, getting start and stop timestamps will be important. Along with the timestamps, you will need to capture the current session ID, as all Session API petition necessitate that value. The introductory format for all of these asking to add a label is: You can capture thesession_idby using this command: And create yourapi_endpoint: Now, we just use a jsonobjective to specify what type of label we want and other specific information need for that label request. Let ’ s use a clip series request as our example. You can refer to this for more details about the additional label eccentric. In this representative, I want to make atime-series-requestthat tracks the Net CPU KPI throughout the entire session and will create a result if it proceed over 10 % at any time during the session. What is Net CPU? In the documentation here, it ’ s described as: Obviously, 10 is only an arbitrary number. Use whatever make sensation to you. Here ’ s thejson object: Let & # x27; s break down each entry: To create the timestamps, foremost, capture the current clip and then convert it into a string target. Once the jsonobject is created, the petition can be constructed: Again, you can fascinate these timestamps throughout the book. These two are at the get-go and end of the test. What are the results? When completed, you can reexamine the Performance Session and see/analyze the results. Here ’ s a screenshot show the Net CPU request and result from this example: The top bar is the duration of the request, the intact test run. The second bar graph is the result showing each time the Net CPU outstrip 10 %. You can create a query like this for every KPI that HeadSpin captures. Just so you can see all of this together and not so broken up, these step are the first part of my handwriting before I create the Desired Capabilities. Then I create theDesired Capabilities and the driver object: Then, I execute the stairs within my script, capturing the timestamps as need. Finally, I capture the end time timestamp, and so I delete the uploaded covering before I create my session labels at the end of the session: In summary, leverage the HeadSpin API Library alongside your Appium script empowers you to enhance your coating testing operation significantly. With this integration, you can seamlessly integrate unique selector values, dynamically choose devices, establish the application across multiple device, and crucially, establish session labels within your script to comprehensively assess coating execution. This flexibility enable you to incorporate numerous session labels tailored to monitor and study key performance indicators vital for your brass & # x27; s goals and object. Lead, Content Marketing, HeadSpin Inc. Piali is a dynamic and results-driven Content Marketing Specialist with 8+ years of experience in craft engaging narratives and market collateral across diverse industries. She surpass in collaborating with cross-functional teams to develop innovative message strategies and deliver compelling, authentic, and impactful content that resonates with target audiences and enhances brand authenticity. Upload your APK or URL. SUSA explores like 10 real users — finds bugs, accessibility violations, and security issues. No scripts needed. Upload your APK or URL. SUSA explores like 10 real users — finds bugs, accessibility violations, and security issues. No scripts.


.png)


How to Leverage the HeadSpin REST APIs in Your Appium Script
AI-Powered Key Takeaways
Introduction
Why Opt for HeadSpin API Calls in Your Appium Script?
Read:
Getting Started
Choosing Your Workflow
HeadSpin API


auth_token = 'a2564fa6141e4a1f8ru4e7046c13acac 'import requestsrequests.get (api_endpoint, headers= {'Authorization ': 'Bearer {} '.format (auth_token)})Also read:
perf_data = {'' session_id '': driver.session_id, '' status '': condition}requests.post (api_endpoint, headers= {'Authorization ': 'Bearer {} '.format (auth_token)}, json=perf_data)Review the HeadSpin API Documentation
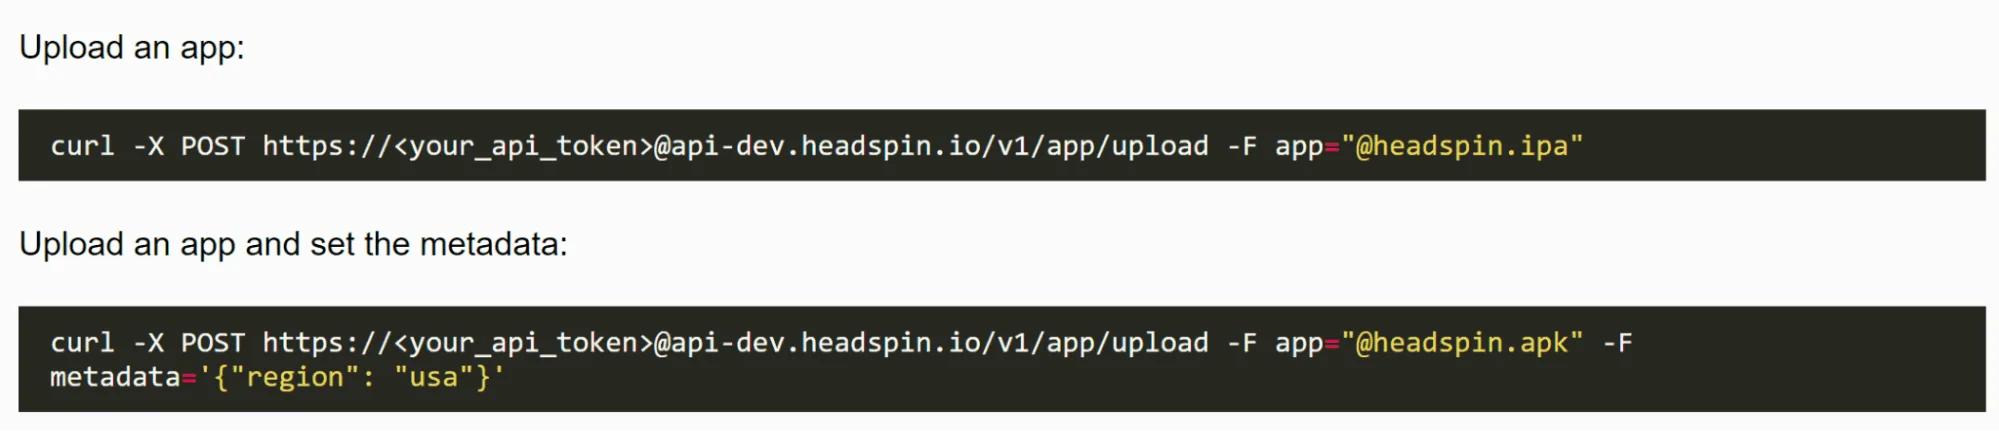
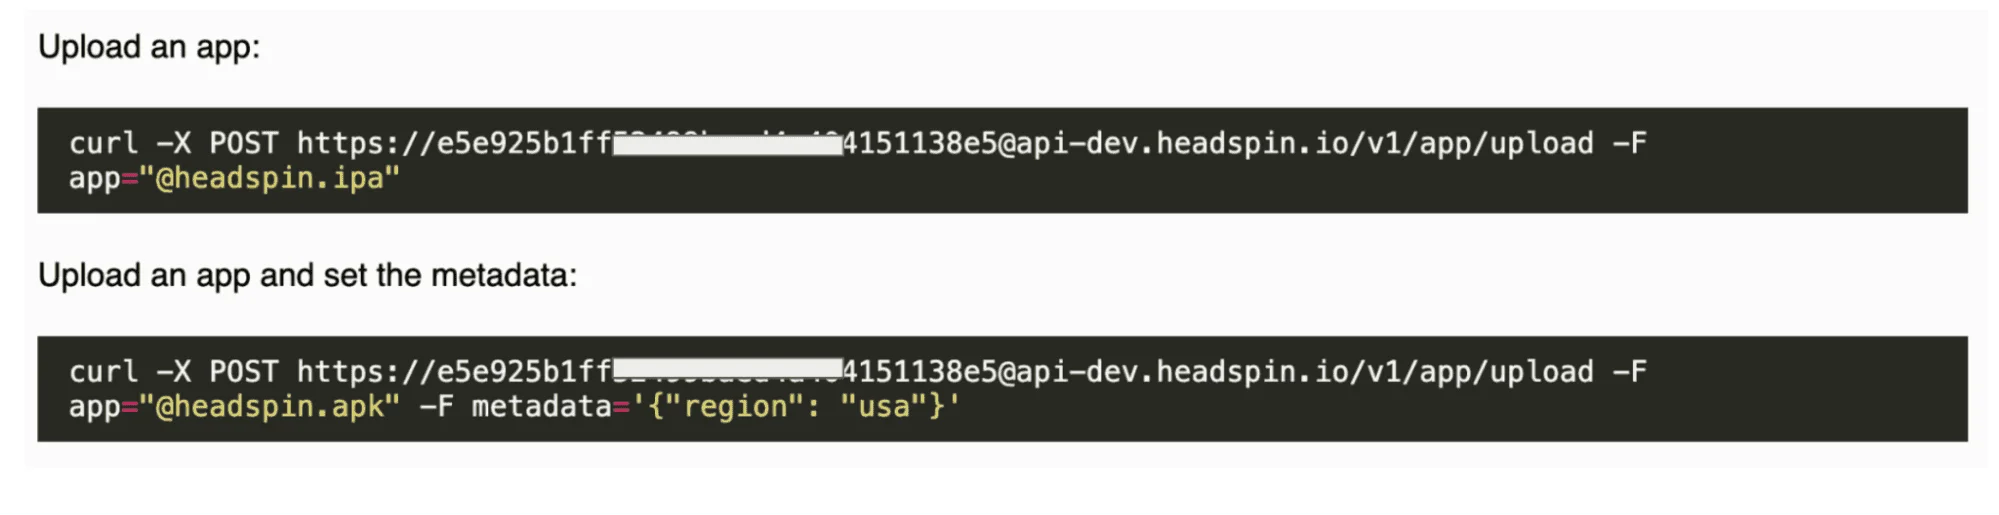
Upload Application APIs
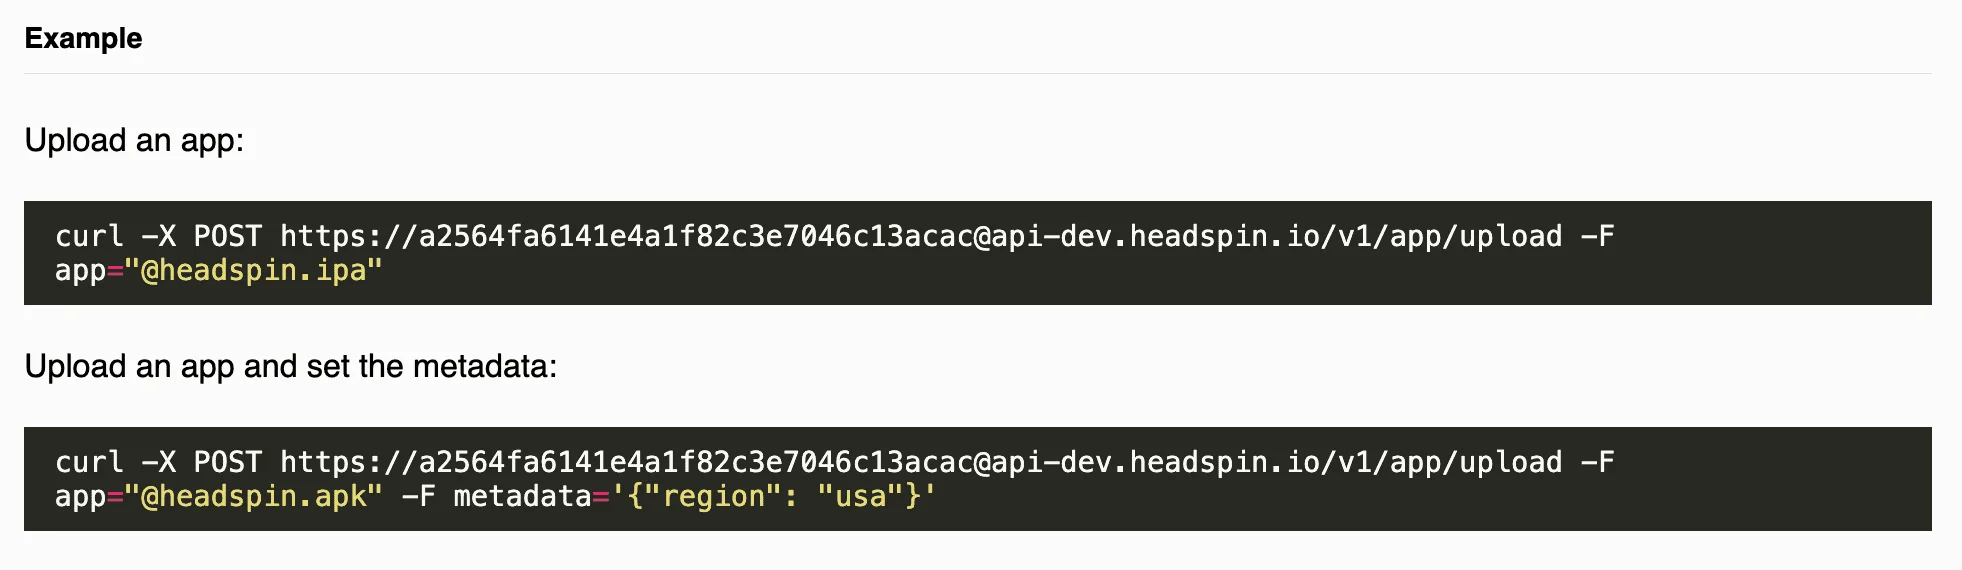

api_endpoint = 'https: //api-dev.headspin.io/v1/app/upload 'file = {'app ': unfastened ('/Users/jamiemoore/Downloads/InsuranceCalculator.apk ', 'rb ')}reply = requests.post (api_endpoint, headers= {'Authorization ': 'Bearer {} '.format (auth_token)}, files=files)files = {'app ': unfastened ('/Users/jamiemoore/Downloads/InsuranceCalculator.apk ', 'rb '), 'metadata ': (None, ' {`` version_tag '': `` ver1 ''} ')}app_upload_result = json.loads (response.text) app_id = app_upload_result ['app_id ']Device Selection APIs
CAPS = {'deviceName ': 'SM-S911U ', 'udid ': 'R5CT625E6DZ ', 'automationName ': 'UiAutomator2 ', 'platformName ': 'Android ', 'appPackage ': 'com.android.settings ', 'appActivity ': 'com.android.settings.Settings'}
https: //dev-us-sny-3.headspin.io:7031/v0/a2564fa61r6e4a1f82c3e7046c13acac/wd/hubhttps: //dev-us-sny-4.headspin.io:7017/v0/a2564fa61r6e4a1f82c3e7046c13acac/wd/hubhttps: //appium-dev.headspin.io:443/v0/a2564fa61r6e4a1f82c3e7046c13acac/wd/hub'' headspin: picker '': `` device_skus: \ '' Galaxy S22\ '' ''scroll -X GET https: //a2564fa61r6e4a1f82c3e7046c13acac @ api-dev.headspin.io/v0/devices/ & lt; device_selector & gt; /informationapi_endpoint = 'https: // @ api-dev.headspin.io/v0/devices/device_state: online+manufacturer: samsung+os_version=12/information 'response = requests.get (api_endpoint, headers= {'Authorization ': 'Bearer {} '.format (auth_token)})device_result_text = json.loads (response.text) for each in device_result_text ['devices ']: if each ['owner_email '] == None: device_id = each ['serial '] else: print ('No available devices ')device_list []device_list += [device_id]for each in device_result_text ['devices ']: if each ['owner_email '] == None: device_id = each ['serial '] device_list += [device_id] else: print ('No available device ')'udid ': device_list [0],

device_address_list = [] for each in device_result_text ['devices ']: if each ['owner_email '] == None: device_id = each ['serial '] device_list += [device_id] device_address = each ['device_address '] device_address_list += device_address else: mark ('No available devices ')api_endpoint = 'https: // @ api-dev.headspin.io/v0/devices/ ’ + device_list [0] + ‘ /automation-config 'response = requests.get (api_endpoint, headers= {'Authorization ': 'Bearer {} '.format (auth_token)})auto_config_text = json.loads (response.text){'R5CT625E6DZ @ dev-us-sny-4-proxy-18-lin.headspin.io ': {'control_url ': 'https: //dev-us-sny-4.headspin.io:19100 ', 'driver_url ': 'https: //dev-us-sny-4.headspin.io:7017/v0/ {api_token} /wd/hub ', 'lock_url ': 'https: //dev-us-sny-4.headspin.io:7017/v0/ {api_token} /lock ', 'unlock_url ': 'https: //dev-us-sny-4.headspin.io:7017/v0/ {api_token} /unlock ', 'host ': 'dev-us-sny-4-proxy-18-lin.headspin.io ', 'driver_lb_url ': 'https: //appium-dev.headspin.io:443/v0/ {api_token} /wd/hub ', 'device_location ': {'country ': 'us ', 'country_readable ': 'US ', 'city ': 'sny ', 'city_readable ': 'Riverside ', 'lat ': 37.36883, 'lon ': -122.0363496, 'carrier ': 'T-Mobile Wi-Fi Calling'}, 'device_carrier ': {'carrier ': 'T-Mobile Wi-Fi Calling ', 'network_type ': 'WIFI ', 'network_subtype ': ``, 'network_connected ': True, 'phone_network ': 'LTE'}, 'capabilities ': {'automationName ': 'uiautomator2 ', 'platformName ': 'android ', 'deviceName ': 'SM-S901U ', 'appPackage ': 'com.android.settings ', 'appActivity ': 'com.android.settings.Settings ', 'udid ': 'R5CT625E6DZ'}, 'os ': 'android ', 'headspin: controlLock ': True, 'headspin.controlLock ': True, 'headspin: seizure ': True, 'headspin.capture ': True}}webdriver_url = auto_config_text [device_address] ['driver_url ']webdriver_url = webdriver_url.replace (' {api_token} ', auth_token)https: //dev-us-sny-4.headspin.io:7017/v0/a2564fa6141e4a1f82c3e7046c13acac/wd/hubdriver = webdriver.Remote (webdriver_url, capableness)Application Installation APIs

api_endpoint = 'https: // @ api-dev.headspin.io/v1/apps/app_identifier: com.tricentis.insuranceCalculatorApp/latest/uninstall/ ' + device_list [0] ' response = requests.post (api_endpoint, headers= {'Authorization ': 'Bearer {} '.format (auth_token)})files = unfastened ('/Users/jamiemoore/Downloads/InsuranceCalculator.apk ', 'rb ') api_endpoint = 'https: //api-dev.headspin.io/v0/adb/ ’ + device_list [0] + ‘ /install 'api_endpoint = 'https: //api-dev.headspin.io/v0/idevice/ ’ + device_list [0] + ‘ /installer/install 'install_output = requests.post (api_endpoint, headers= {'Authorization ': 'Bearer {} '.format (auth_token)}, data=files)CAPS = {'headspin: app.id ': app_id, 'udid ': device_list [0], 'automationName ': 'UiAutomator2 ', 'platformName ': 'Android ',}api_endpoint = 'https: // @ api-dev.headspin.io/v1/apps/app_identifier: com.tricentis.insuranceCalculatorApp+version_tag: ver1/latest/install/ ' + device_list [0] install_output = requests.post (api_endpoint, headers= {'Authorization ': 'Bearer {} '.format (auth_token)})Prepare Your Appium Script
CAPS = {'udid ': device_list [0], 'automationName ': 'UiAutomator2 ', 'platformName ': 'Android ', 'appPackage ': 'com.android.settings ', 'headspin: capture ': 'True ’ 'appActivity ': 'com.android.settings.Settings'}driver = webdriver.Remote (webdriver_url, capableness)Session APIs
/v0/sessions/ {session_id} /label/addsession id = driver.session_idapi_endpoint = f'https: //api-dev.headspin.io/v0/sessions/ ' + session_id + '/label/add '
Net CPU Usage: The net CPU usage on the twist. This value is system-wide CPU employment as a percentagenet_cpu_data = {'' name '': `` Net CPU Above 10 % '', '' label_type '': `` time-series-request '', '' category '': `` an optional category for the label '', '' ts_start '': stringSearchStart, '' ts_end '': videoEndTime, '' data '': {`` method '': `` range '', `` time_series_key '': `` net_cpu '', `` argument '': {`` lower_limit '': 10.0}}, '' immobilise '': TruestartTime = time.time () stringSearchStart = str (startTime) sessionEndTime = time.time () videoEndTime = str (sessionEndTime)net_cpu_output = requests.post (api_endpoint, headers= {'Authorization ': 'Bearer {} '.format (auth_token)}, json=net_cpu_data)
Putting It All Together
# Upload the app register = {'app ': open ('/Users/jamiemoore/Downloads/InsuranceCalculator.apk ', 'rb '), 'metadata ': (None, ' {`` version_tag '': `` ver1 ''} ')} api_endpoint = 'https: //api-dev.headspin.io/v1/app/upload' response = requests.post (api_endpoint, headers= {'Authorization ': 'Bearer {} '.format (auth_token)}, files=files) app_upload_result = json.loads (response.text) app_id = app_upload_result ['app_id '] # Select a device api_endpoint = 'https: // @ api-dev.headspin.io/v0/devices/device_state: online/information' response = requests.get (api_endpoint, headers= {'Authorization ': 'Bearer {} '.format (auth_token)}) device_result_text = json.loads (response.text) device_list = [] device_address_list = [] for each in device_result_text ['devices ']: if each ['owner_email '] == None: device_id = each ['serial '] device_list += [device_id] device_address = each ['device_address '] device_address_list += device_address else: print ('No available device ') # Make sure the app is deleted on the device api_endpoint = 'https: // @ api-dev.headspin.io/v1/apps/app_identifier: com.tricentis.insuranceCalculatorApp/latest/uninstall/ ' + device_list [0] response = requests.post (api_endpoint, headers= {'Authorization ': 'Bearer {} '.format (auth_token)}) # Install the application on the gimmick api_endpoint = 'https: // @ api-dev.headspin.io/v1/apps/app_identifier: com.tricentis.insuranceCalculatorApp+version_tag: ver1/latest/install/ ' + device_list [0] install_output = requests.post (api_endpoint, headers= {'Authorization ': 'Bearer {} '.format (auth_token)}) # Get the WebDriver URL for the take gimmick api_endpoint = 'https: // @ api-dev.headspin.io/v0/devices/serial: ' + device_list [0] + '/automation-config' reply = requests.get (api_endpoint, headers= {'Authorization ': 'Bearer {} '.format (auth_token)}) auto_config_text = json.loads (response.text) webdriver_url = auto_config_text [device_address] ['driver_url '] webdriver_url = webdriver_url.replace (' {api_token} ', auth_token)CAPS = {'udid ': device_list [0], 'autoAcceptAlerts ': True, 'automationName ': 'UiAutomator2 ', 'platformName ': 'Android ', 'appPackage ': 'com.tricentis.insuranceCalculatorApp ', 'appActivity ': 'com.tricentis.mobile.MainActivity ', 'headspin: seizure ': 'True ', 'adbExecTimeout ': '100000'} driver = webdriver.Remote (command_executor=webdriver_url, desired_capabilities=CAPS)startTime = time.time () carButton = wait.until (EC.presence_of_element_located ((MobileBy.ID, 'com.tricentis.insuranceCalculatorApp: id/Car ')))session_id = driver.session_id sessionEndTime = time.time () videoEndTime = str (sessionEndTime) driver.execute_script ('headspin: quitSession ', {'status ': 'passed '}) # Delete the Uploaded Application api_endpoint = 'https: // @ api-dev.headspin.io/v1/app/ ' + app_id + '/delete' delete_output = requests.delete (api_endpoint, headers= {'Authorization ': 'Bearer {} '.format (auth_token)}) # Create the Net CPU Time Series Request # Net CPU net_cpu_data = {`` name '': `` Net CPU Above 10 % '', `` label_type '': `` time-series-request '', `` class '': `` an optional class for the label '', `` ts_start '': stringSearchStart, `` ts_end '': videoEndTime, `` data '': {`` method '': `` range '', `` time_series_key '': `` net_cpu '', `` parameters '': {`` lower_limit '': 10.0}}, `` immobilise '': True} net_cpu_output = requests.post (api_endpoint, headers= {'Authorization ': 'Bearer {} '.format (auth_token)}, json=net_cpu_data)Conclusion
Jamie Moore

![]()
Piali Mazumdar

![]()
How to Leverage the HeadSpin REST APIs in Your Appium Script
4 Parts
-1280X720-Final-2.jpg)
Regression Intelligence practical guide for advanced user (Part 3)
Regression Intelligence practical guide for advanced users (Part 4)
Discover how HeadSpin can empower your business with superior testing capabilities
![]()
![]()
![]()
![]()
![]()
![]()
![]()
![]()


![]()
![]()

Discover how HeadSpin can empower your job with superior testing capabilities
![]()
![]()
![]()
![]()
![]()
![]()
Discover how HeadSpin can empower your business with superior screen capabilities
![]()
![]()
![]()
![]()
![]()
![]()
Connet Now


![]()
![]()
![]()
![]()
![]()
![]()
![]()
Automate This With SUSA
Test Your App Autonomously


.png)