Using Espresso to Test Mobile Applications in Android Studio
Sauce AI for Test Authoring: Move from intent to execution in minutes.|xBack to ResourcesBlogPosted
Sauce AI for Test Authoring: Move from intent to execution in minutes.
|
x
Blog
Using Espresso to Test Mobile Applications in Android Studio
Understand how to use Espresso as a examination fabric for roving covering ontogeny.

Espresso is a quiz framework for Android that make it easy to indite reliable user interface tests directly within the Android Studio Integrated Development Environment (IDE). Espresso is targeted at developers who understand that automated quiz is an integral part of the growing lifecycle. Understanding how to use Espresso is fast becoming a required skill for developers to have, particularly those developers focused on mobile coating development.
While it can be used for black-box testing, Espresso ’ s full ability is unlocked when the codebase under test is exposed and accessible at the seed code level. Once Espresso can run against source code, a unscathed world of possibilities opens up in terms of peregrine testing. Not solely can you can use Espresso to do a mobile website test against browsers that are embedded in cell phone and tablets, but you can use Espresso as a mobile app try creature to run against features in a aboriginal application.
Regardless of the direction you guide in wandering testing, browser base or testing against native applications, Espresso is powerful and elastic. Also, because Espresso is establish flop into the Android Studio Integrated Development Environment (IDE), developers can get up and running in short order.
In this article we ’ ll take a look at the particulars of habituate Espresso to do peregrine testing under Android Studio. In improver we & # x27; ll discourse the making applications leisurely to test by separate UI code from business logic. Lastly, we ’ ll look at how to create useful Espresso test reports from within Android Studio.
Creating Testable Code
Before delving into the details of automate peregrine test habituate Espresso, it ’ s crucial to understand an essential concept in package testing -- creating testable codification.
One of the common mistakes do by developers new to machine-driven testing is failing to create code that is testable. Ensuring that an application is testable is a practice that is better make when the code is being designed, not later in the software development lifecycle.
A uncomplicated analogy is being able to test a tyre ’ s air pressure on an automobile. All those involved in do a car understand that checking tire pressure is an all-important feature of the vehicle. Thus, those designing the car will do better to do sure that the air valve is on the outside of the tire, easily accessible to the driver for quiz. Putting the air valve on the inside of the tyre forces the driver to crawl underneath the chassis to find the air valve in order to apply the pressure gauge. The bad design hinders the power of the driver to check a tire ’ s press easy and quickly. Of course, no automobile designer in his or her correct mind would put the air valve on the interior of a tyre. But, there are more than a few instances out thither where developers make code that ’ s hard to test or wholly untestable. To use our analogy, they put the air valve on the inside of the tire. Usually the developer writing such code was not responsible for testing the code written, or had no knowledge of the testing that needed to be support. Thus, the codification terminate up downstream in the software development lifecycle (SDLC), in the hands of a QA engineer afford the undertaking to figure the testing out. This is money wasted. The prescript of thumb in software growing is that the cost of employment addition as the code goes further down the SDLC. Determining test requirements and testing implementation at the design clip saves money and increase the speed of release overall.
One of the best fashion to ensure that a yield codebase is testable, is to make certain that the code is well encapsulated and that it postdate the designing principle ofseparation of care. At the least, the UI codification should be distinctly freestanding from the codification for business logic and data access. Figure 1, below, illustrates the concept.
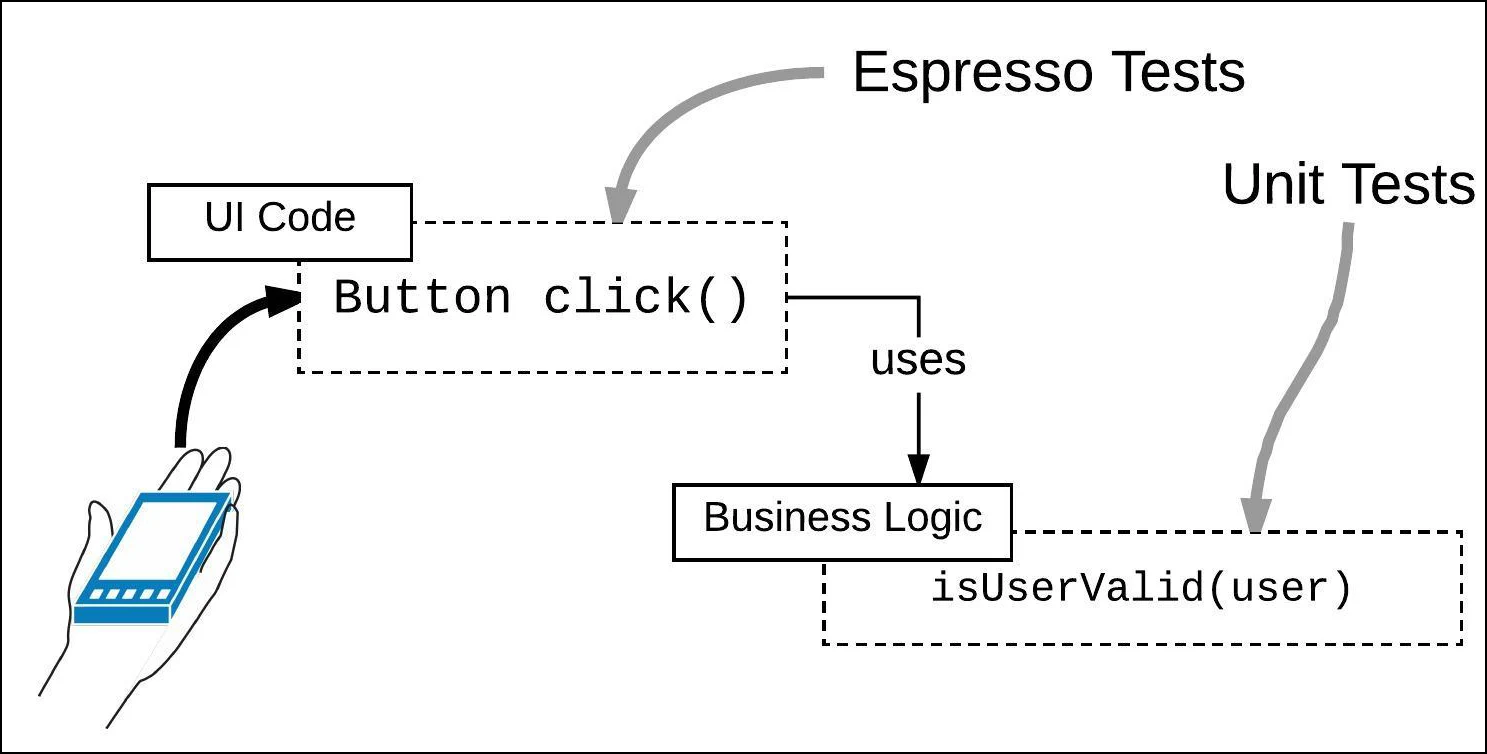
Figure 1: Separating UI functionality from business logic is a good practice not only for programming, but also for testing
Fortunately, the mechanics for severalize UI Code from concern logic code built into the Android Studio labor framework. Android Studio organizes UI tests under the category name,androidTestand business logic tests under,test. (You ’ ll see the automatic categorization of tests in the next subdivision, when we review apply the Espresso Test Recorder.)
The important thing to remember is that occupation logic code should be separate from UI code. Separating UI from concern logic code is not only a good recitation in terms of package blueprint, but makes testing a lot easy.
Using the Espresso Recorder
One of the most utilitarian testing features of Android studio is the Espresso Test Recorder. The Espresso Test Recorder allows developer to create Espresso tests by automatically recording interactions performed upon a device emulator. For example, developer can select UI elements such textboxes and dropdowns as well as selection and checkboxes into which data is participate via keyboard screen tap. All the action is recorded by the Test Recorder. Once recorded, a developer can use the script that is result of the recording as a guide upon which to build more comprehensive tests.
Listing 1 below show a snip of UI examination code create habituate Espresso Test Recorder. This trial codification facilitates a push click and confirms that the textarea expose text.
@Test
public void simpleButtonClickTest () {
ViewInteraction appCompatButton = onView (
allOf (withId (R.id.button), withText (& quot; Get Saying & quot;), isDisplayed ()));
appCompatButton.perform (click ());

ViewInteraction viewGroup = onView (
allOf (childAtPosition (childAtPosition (withId (android.R.id.content),
0) ,1), isDisplayed ()));
viewGroup.check (matches (isDisplayed ()));
}
Listing 1: The Espresso Recorder records interaction with the UI into code in a test file.
For autonomous testing across multiple user personas, check out SUSATest — it explores your app like 10 different real users.
You approach the Recorder from the Run menu item in the Android Studio menubar as shown below in Figure 2.
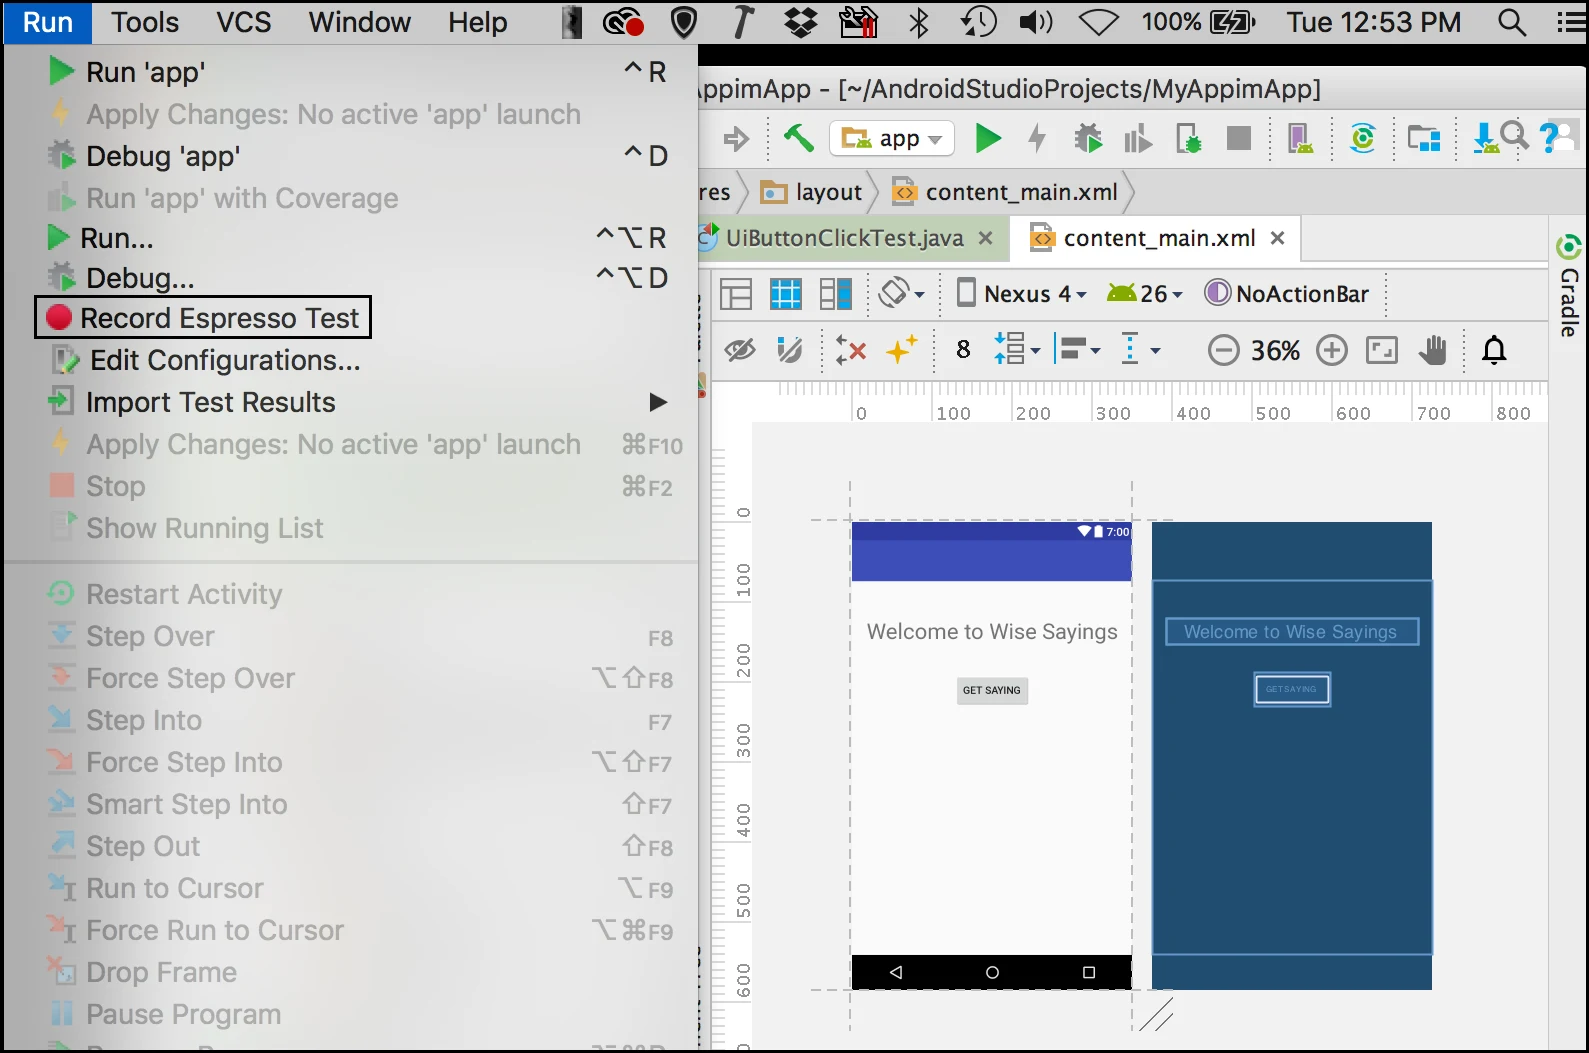
Figure 2: The Espresso Test Recorder is make right into Android Studio
The Recorder will fire up a dialog in which you to select a device emulator to use. For example, you can opt a generic x86 or ARM emulator. Or you can pick an emulator that is more specific, such as a Galaxy or Pixel gimmick. Of trend, the developer can always choose to connect a real mobile device to his or her growing machine and trial against the real hardware. Then, the developer goes about making the gestures and entering data that is relevant to the scope of quiz underway. The Recorder allows a developer to add an assertion after each data entry case. Being able to add assertion as part of the transcription sessions saves significant time test conception summons. Listing 2 below shows a tryout, simpleResponseTest that is the result of a trial enter session in which an asseveration is declared while record.
@Test
public emptiness simpleResponseTest () {
ViewInteraction appCompatButton = onView (
allOf (withId (R.id.button), withText (& quot; Get Saying & quot;), isDisplayed ()));
appCompatButton.perform (click ());

ViewInteraction textView = onView (
allOf (withId (R.id.textView), withText (& quot; Be Kind To Strangers & quot;),
childAtPosition (IsInstanceOf. & lt; View & gt; instanceOf (android.view.ViewGroup.class), 1),
                           0),
isDisplayed ()));
textView.check (matches (withText (& quot; Be Kind To Strangers & quot;)));
}
Listing 2: The Espresso Recorder allows the developer to add statement during a recording session
Once you finish a recording session, the Recorder will ask you to declare the name of the file in which to save the recorded code. The Espresso Test Recorder has the intelligence to store the test file in a category nominate,androidTest, as shown below in Figure 3.
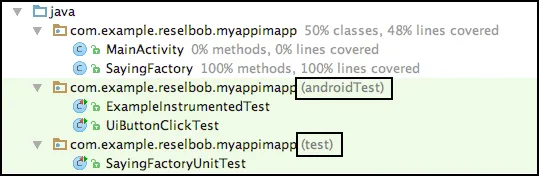
Figure 4: Android Studio distinguishes between device UI tests (androidTest) and concern logic unit examination (test)
As mentioned earlier, Android Studio segments UI test from job logic unit tests. UI Tests will be prove under Espresso against the chosen device copycat invoked mechanically by Android Studio. Business logic trial will be run utilizeJUnitfrom within Android Studio too. After the tests are run Android Studio report the results of the various tests. Test reportage is a critical feature of Android Studio in general, and Espresso in particular.
Ensuring Quality by Using Coverage Reports
When it comes to ensuring the quality of a given code foot, there are two canonical metrics that are typically habituate to quantitatively determine code quality. These metric are Pass/Fail portion and Code Coverage.
The Pass/Fail metric reports the number of tests that have pass. The Code Coverage report indicates the lines of codification that experience been exercised by a test. The general recitation is that you want your tests to exercise all the lines of code that experience been written. Code that has not been exercised by a test is constantly a endangerment.
The goal in terms of an passable testing practice is make sure that all the tests that have been created for the application walk and that those tests exercise all the lines of code in the codebase. In early words: all tests legislate and code coverage is as nigh to 100 % of the codebase as possible.
Running Tests
You select the exam or test packet you want to run in and Android Studio project pane. Then right snap the selection. You can Run the test, Debug a test, or run the examination with Coverage, as shown below in Figure 5.

Figure 5: Running tests in Android Studio
When you select the coverage option, not only will the examination be executed, but also a coverage report relevant to the test will be make.
Viewing Test Results
After a test is run, Android Studio evidence the results in the Run pane on the lower left of the IDE as evidence below in Figure 6. Also, should you feature run the tests with coverage, the reporting report will be uncommitted in the pane in the upper right of the IDE.
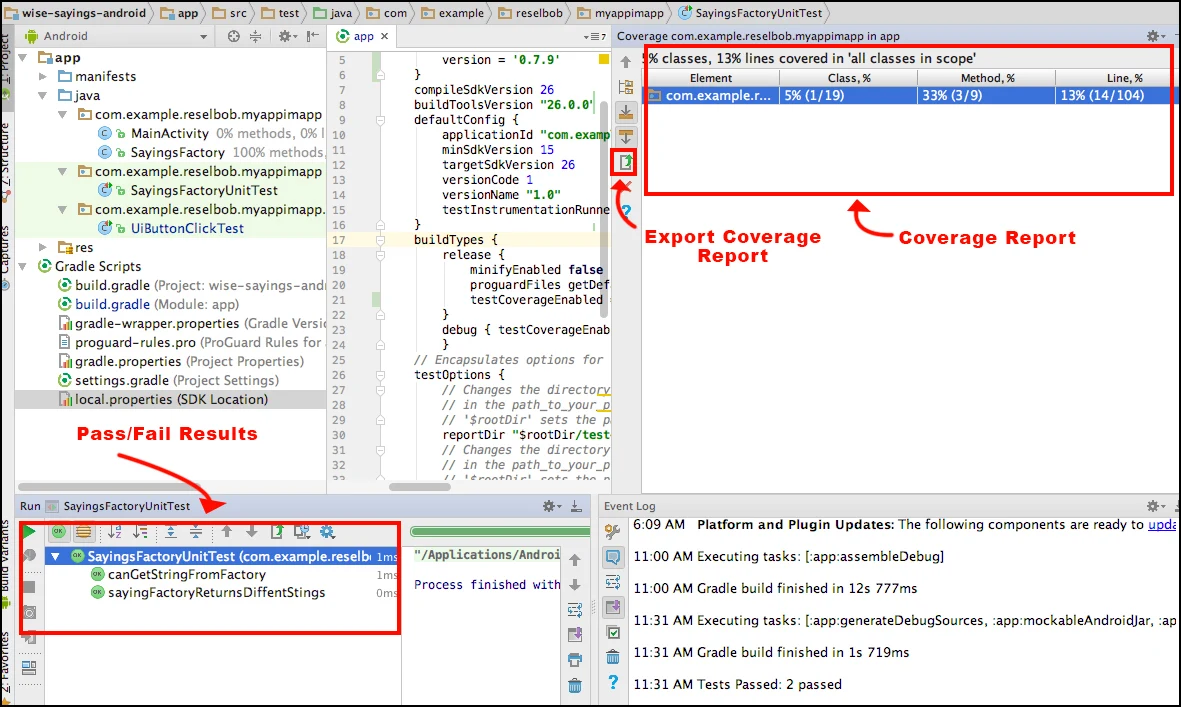
Figure 6: Android Studio displays Pass/Fail and Coverage information within the IDE
In improver to being able to consider the Coverage Report from within the IDE, you can export the Coverage Report into a set of HTML documents that let practice down inspection. You export the reportage report by clicking the Export button on the left side of the Coverage Pane, as shown in Figure 6, above. You will be inquire to declare a location to save the HTML file set. Once you save the reportage report you can consider it in your browser.
Figure 7 below shows an excerpt from a Coverage Report generated by Android Studio.
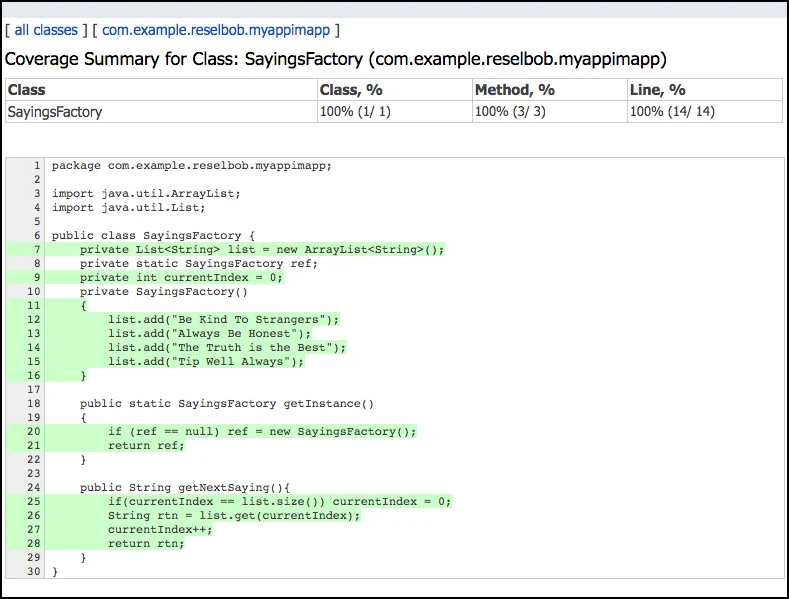
Figure 7: Lines of codification that experience be exercised by UI tests are highlight in light-green in the Coverage Report
The Coverage Report displayed in Figure 7 indicates that all the line of codification written in the family,SayingsFactory, has been exercised by a unit trial within Android Studio. 100 % test coverage for a class is excellent. However, exactly because one class has 100 % reporting, it does not necessarily follow that the intact codebase is well exercised. The goal is to have a high coverage number, as tight to 100 % as possible for the entire codebase. Thus, developers and quizzer need to project a testing implementation that create certain that a high coverage percentage is achieved for of the entire codebase.
Putting It All Together
Espresso is a powerful creature that enable Android developers to implement mobile testing easy and comprehensively. Developers can use tools such as the Espresso Test Recorder from within Android Studio IDE to get mobile quiz an integrated part of the overall package development experience. Also, the reporting features available within Android Studio allow developers to make sure that the codification under test meets essential quality requirements. Integrating test reporting into Android Studio allows developers to find and address issues when writing code, not subsequently on downstream in the software development process when making fixture becomes more expensive.
Comprehensive testing is an crucial part the Software Development Lifecycle. When a developer lead the time to surmount Espresso, he or she will realize returns that far outweigh the investing made. Modern developers understand creating and executing both UI and unit tryout continuously throughout the Software Development Lifecycle are critical requirements for do quality code. Espresso is an important tool that will help developer make the tests that count in order to create software that enumerate.

Automate This With SUSA
Upload your APK or URL. SUSA explores like 10 real users — finds bugs, accessibility violations, and security issues. No scripts needed.
Try SUSA FreeTest Your App Autonomously
Upload your APK or URL. SUSA explores like 10 real users — finds bugs, accessibility violations, and security issues. No scripts.
Try SUSA Free