Automating Custom IoT Devices With Appium - Part 2
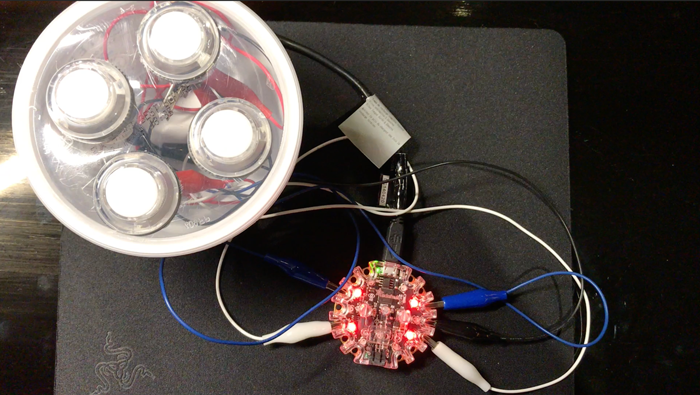
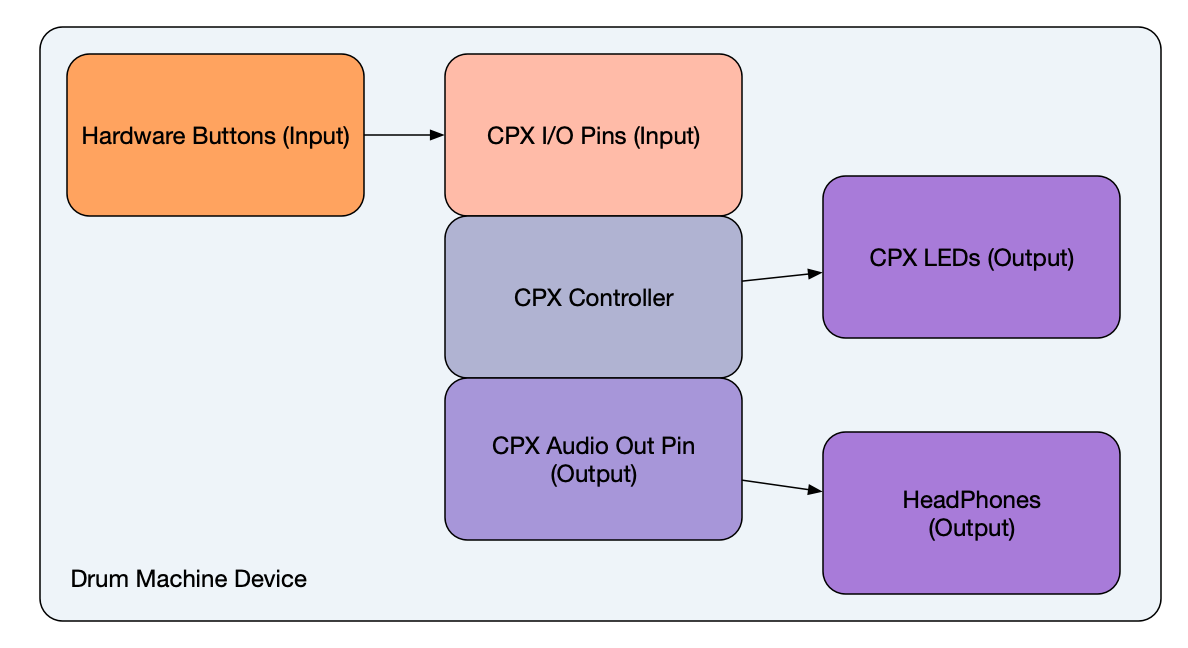
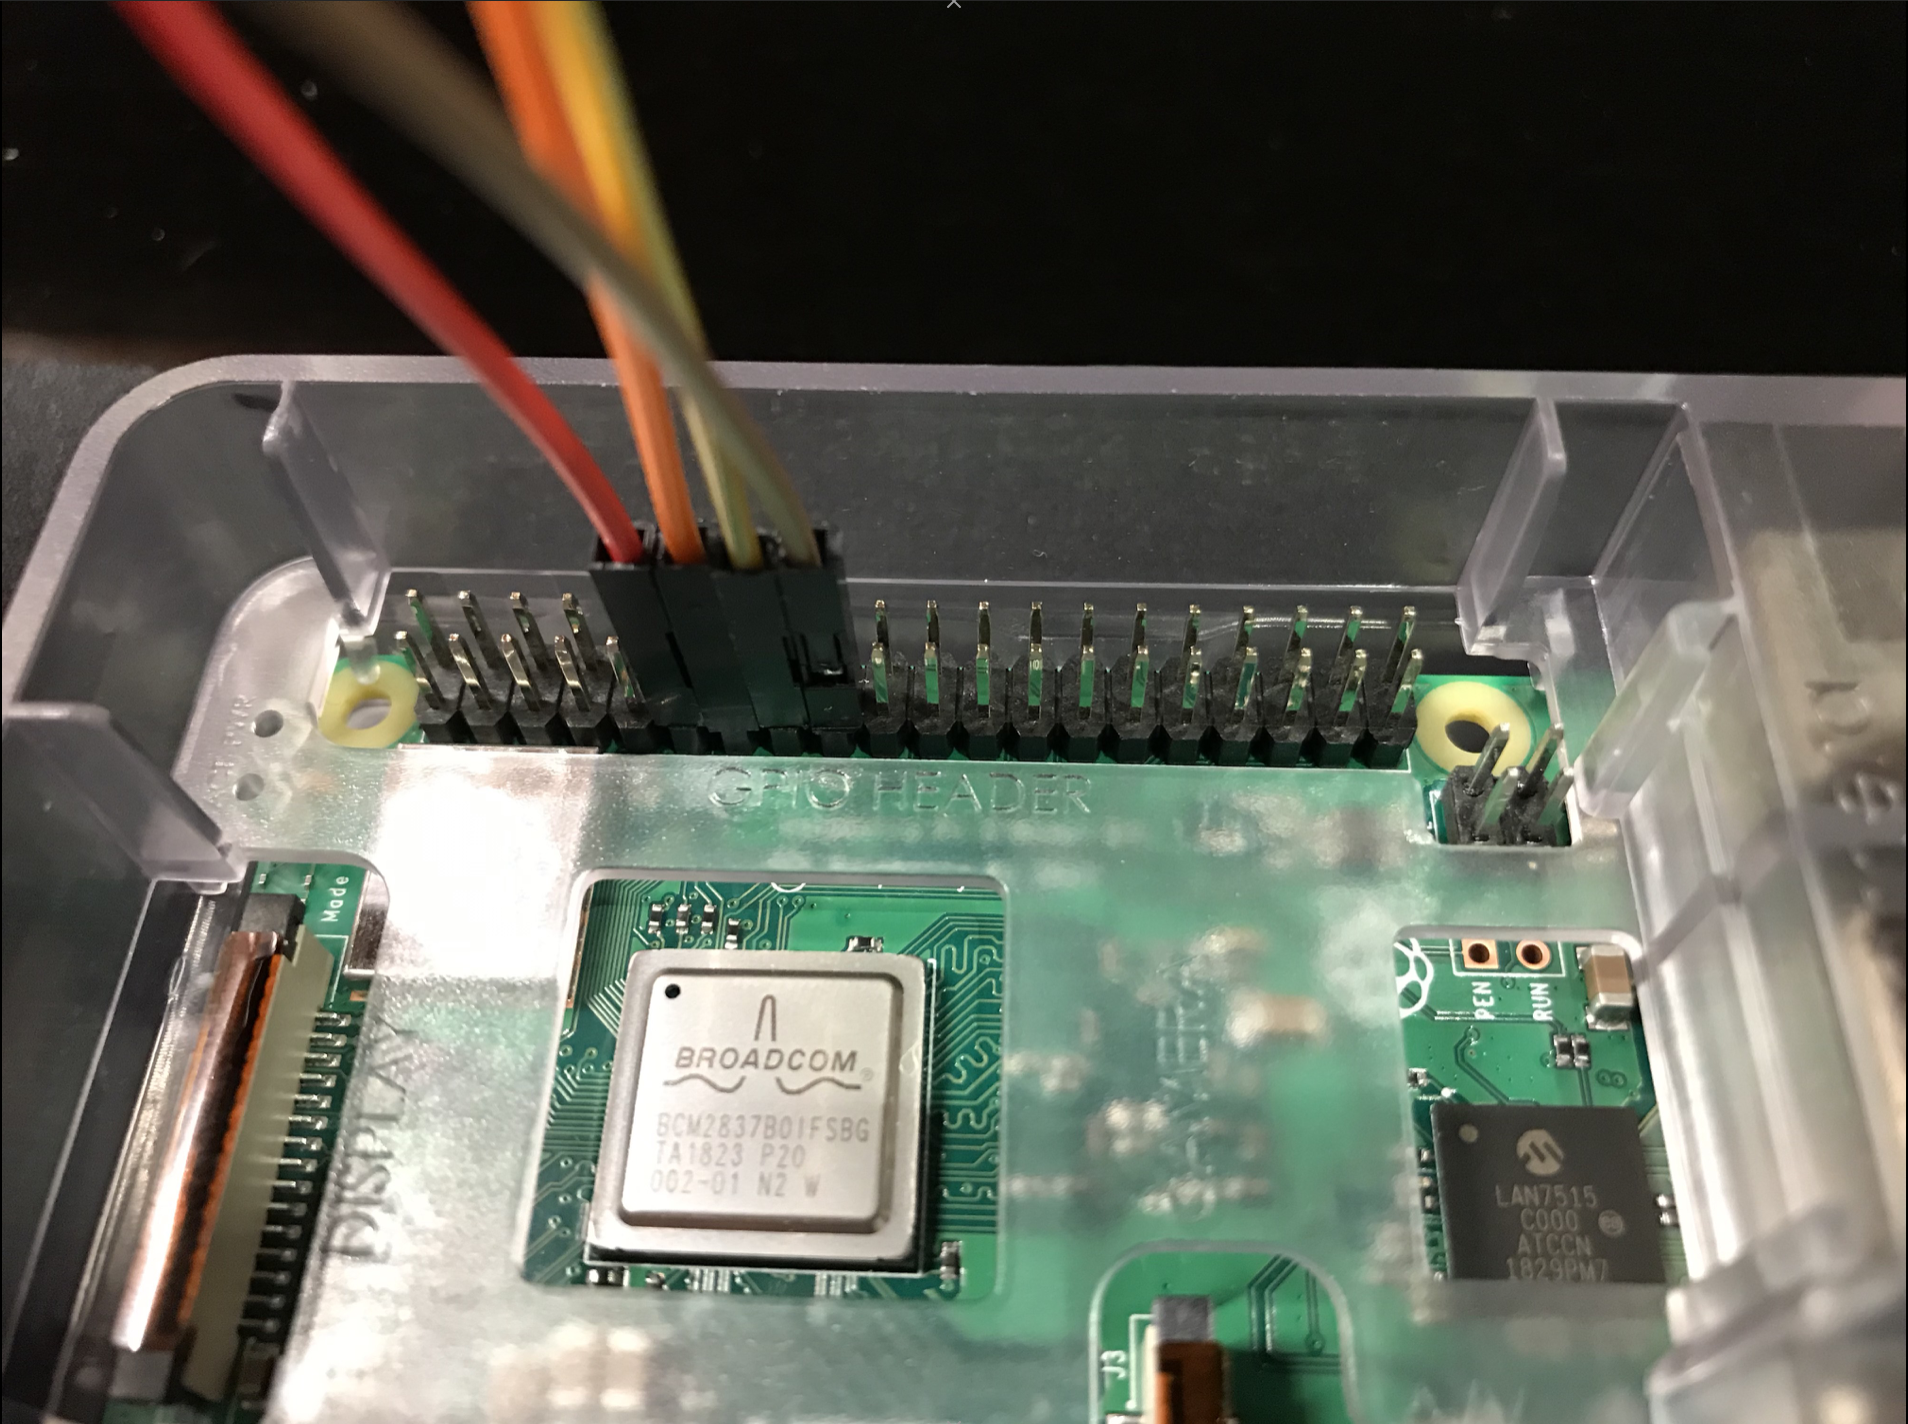
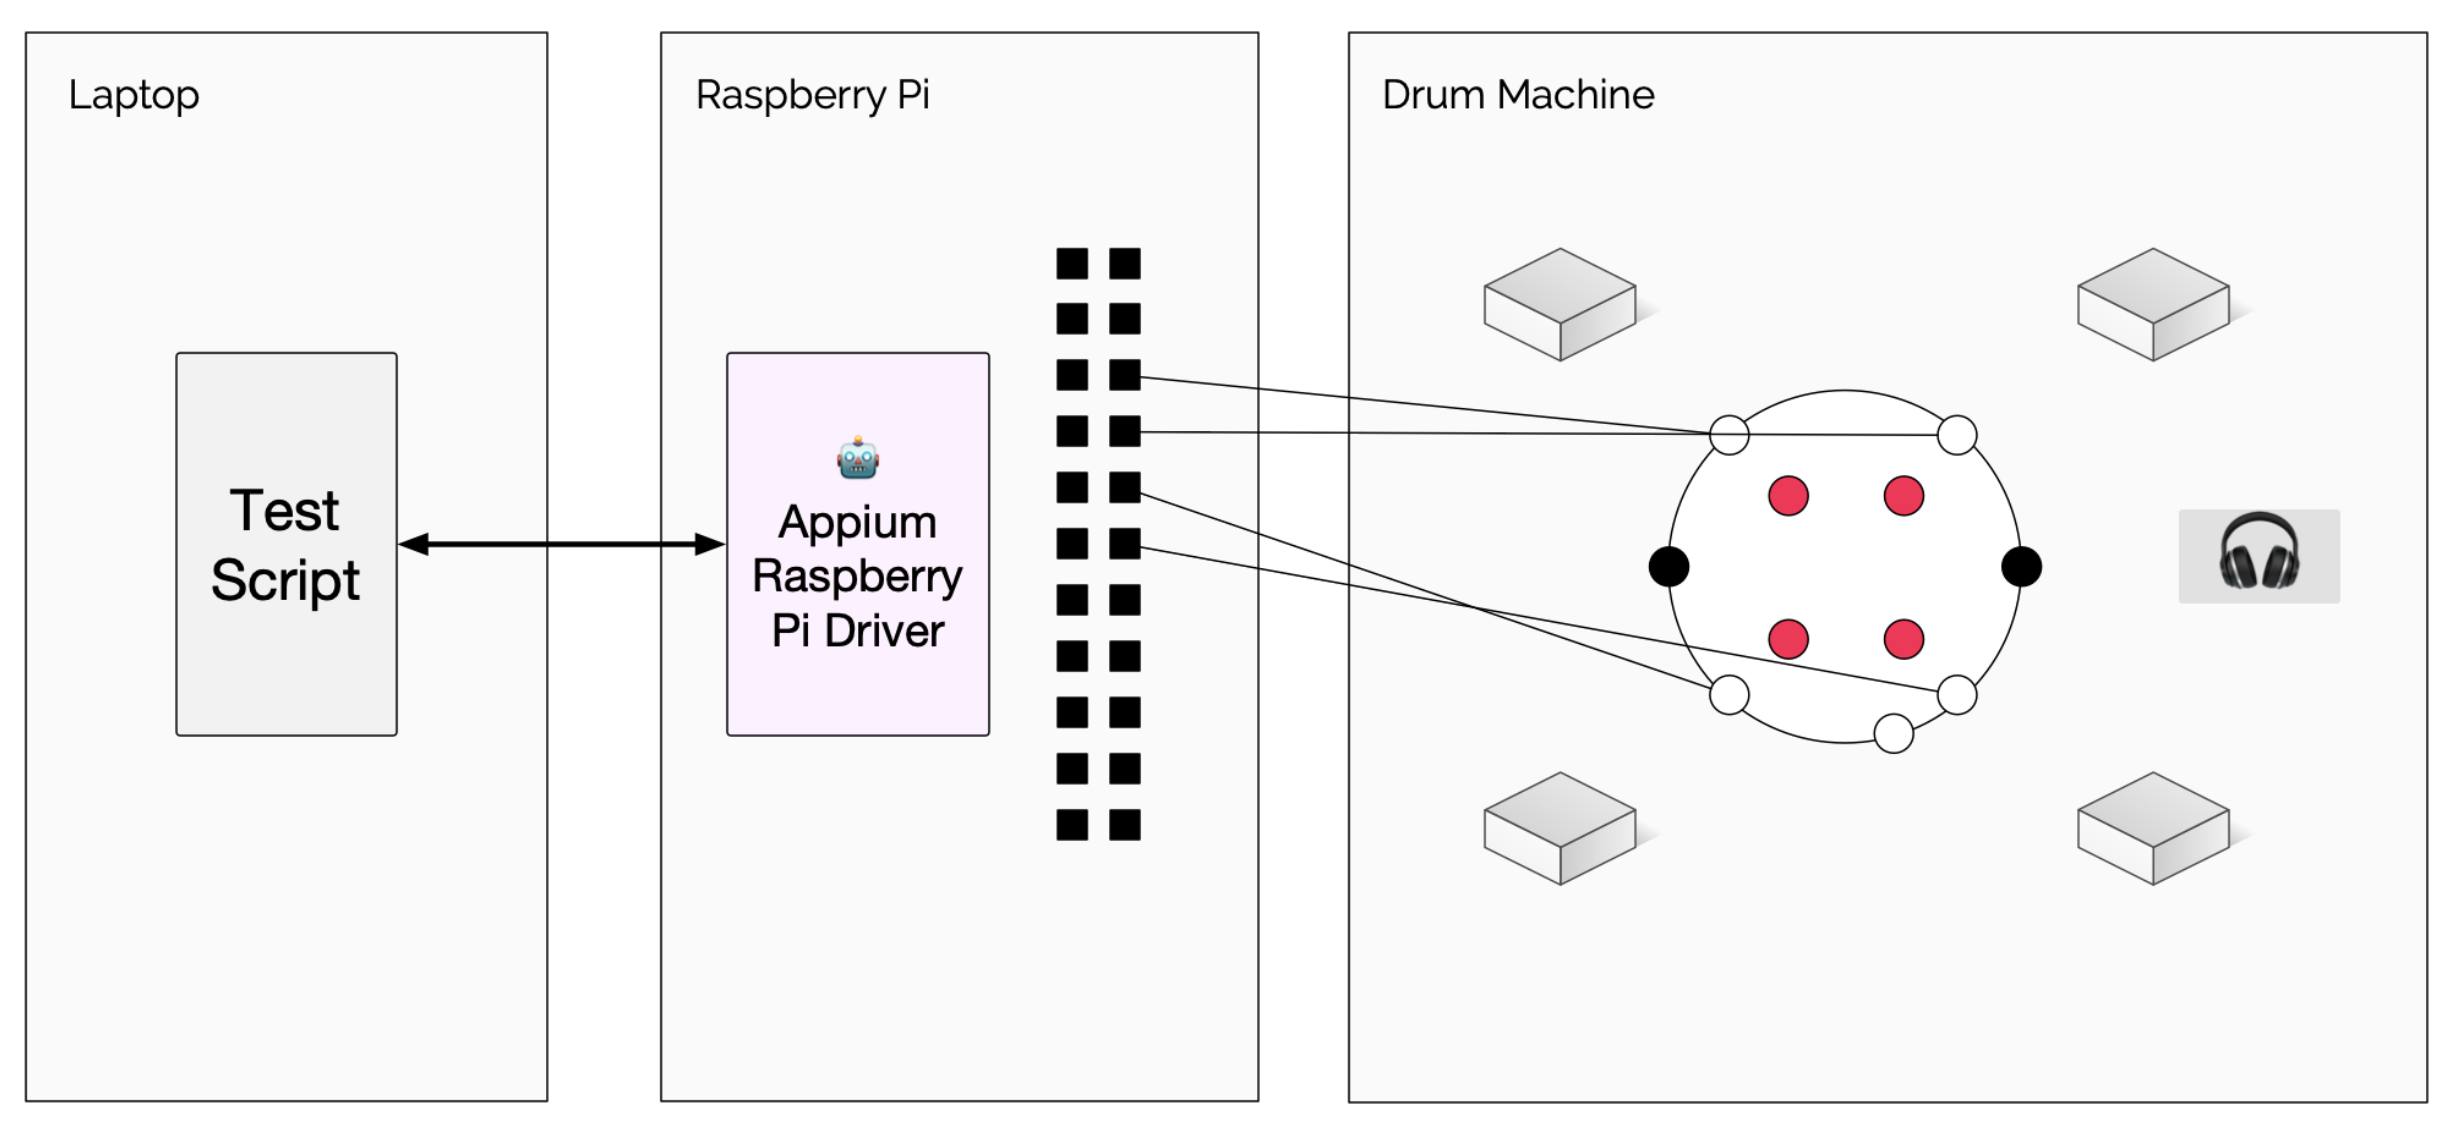
This article is the second in a two-part series on use Appium with platformverydifferent from nomadic operating systems. Make sure to read the first! We end the first part of this series with a fully functional barrel machine, power by a Circuit Playground Express and some simple hardware components like button and LEDs. Now we get to the interrogative of how totestthis device. As we begin to conceive about the question, we realize that there are several different property we can insert a exam component in the application & quot; stack & quot;. For acknowledgment, hither & # x27; s the app & quot; plenty & quot;: Now, any good exam must (1) trigger, synthesize, or simulate some inputs, and (2) validate the outputs. For the purposes of this exploration, we & # x27; re going to pore on the first half of this -- the input automation. (Verifying the output in this case would involve capturing the audio and running it through some kind of, and fix up a camera or light detector to track the LEDs.) So just considering the input, we experience 3 potential places to hook into the stack with our automation: So which level of mechanisation should we choose? It really depends on what we like most about quiz, and what we have the ability to do. By far the easiest thing to do would be to indite codification that simply affect a push has been urge. But this is pretty unsatisfying, because by doing this we & # x27; re not actually testing thedevice, only the microcontroller on to the output. Ultimately, I choose unwavering # 2, largely because I don & # x27; t know how to build golem that tap button on bid. And I felt # 2 is still a reasonable & quot; end-to-end & quot; test of the barrel machine. We & # x27; re not testing the buttons, true, but we can credibly assume they & # x27; ve been well-tested by the button manufacturer. So what we want is a way to trigger electric signaling to the CPX & # x27; s I/O pins in incisively the same way that a push press would. Well, the best way to trigger electrical signals on command is via ... another microcontroller! Enter theRaspberry Pi 3 Model B. This is a slight computer that pass to have a set of its ownGPIO pins. What this means is that we can program a Raspberry Pi to send whatever electric signals we want, include ones that emulate what bechance when the push of our barrel machine are pressed. This is what our Raspberry Pi looks like with wires attach to the GPIO pins: Now all we need is a way to automatise the Raspberry Pi GPIO pins, and that is where we can involve Appium, because there is now anAppium driver for the Raspberry Pi. I create this driver with this coating in mind, and so it is rattling limited in its functionality. All it can do is get and stop session, and control whether a particular pin is turned on or off. Luckily, that & # x27; s all we need. Diagrammatically, it appear something like this: (If you & # x27; re concerned in seeing how the Appium Raspberry Pi driver works under the hood, receive a look at its root code. It extends Appium & # x27; s BaseDriver stratum, and admixture in functionality from the Johnny Five Node.js library, which enables leisurely control of the board). Because the Raspberry Pi is a full-on calculator that can run Node.js, we can simply run the Appium driver on it straightaway (after cloning the repo and running npm install in it, of course, and see our Pi has all the requisite dependencies): Pro tip: Tools like SUSA can handle this autonomously — upload your app and get results without writing a single test script. Notice that we have to be explicit about the reference we want our waiter to run on, if we want the server to be accessible from a computer running the examination script elsewhere on the network (or we could only run the test script on the Pi). So that takes care of the server, but we still have to vex about writing a test to execute on it. As with any Appium test, there are two basic components to a test using this driver: the capabilities, and the test steps themselves. For the Appium Raspberry Pi driver running in standalone modality, all we need is one capability: app. This capableness is very significant, because it state the driver which pins we want to automate, and what their initial states will be. If you think about it, we need to have 3 pieces of information in order to automate this scenario successfully: The reason we care about # 2 is that, as we develop our test, we would prefer to act with & quot; element & quot; whose name correspond to the appropriate places on the device-under-test,notthe Raspberry Pi pins themselves (because what if we prefer to plug them into different pin next time we run the test? That would make our locators & # x27; brittle & # x27;). Ultimately, the app capability I delimitate looked like this: In other lyric, it specifies a set of 4 pin map. The gens of each pin is its gens on the Rasbperry Pi GPIO heading. The associated id is the gens of the terminal on the CPX that we want to send (or stop sending) electric signals to. The mode of the pin is either input or output, and init can be either 1 or 0 free-base on whether we require the initial province of the pin at the first of the test to be high or low. What this app definition allows us to do is work with & quot; constituent & quot; in our examination code, just as if we were looking for UI elements on a blind: In this illustration, we are finding an & quot; element & quot; named & quot; A1 & quot;. Since we have render the Raspberry Pi driver with our app config, the driver cognize that when we interact with this ingredient, we will be sending signal via the & quot; P1-7 & quot; output pin. And of line, we could have call & quot; A1 & quot; anything we desire, yet something more human-readable like & quot; KickDrum & quot; -- I chose to name it after the names of the IO pins on the CPX, so I would forever cognize what telegraph to connect where. (As testers, if we had access to the app code, we could of line auto-generate this app definition to ascertain everything works no matter where we & # x27; ve select to connect our wire). OK, so we can find an ingredient. But what can we do with it? The sole thing we can do with elements retrieved via this driver is set them to a digital high or low signal, represented by the strings & quot; 1 & quot; and & quot; 0 & quot; respectively. To register these values, we use the plain old sendKeys command! The above bidding tells the pin represented by the previously-retrieved element to change to a low/zero signal. That is all that is possible with the current state of the Appium Raspberry Pi driver, though in the hereafter it would be easy to add support for higher-level components available on the Pi via the Johnny Five API -- -but for the interest of simply drive another electronic device via signals in this way, the current set of commands is all we demand. So all that stay for us is to actually write some trial code! Here & # x27; s the code I used in myAppiumConf 2019 talking demo. It & # x27; s written in JavaScript, because that was the lyric that I felt most comfortable developing the non-Appium part of the code is (the code responsible for parsing a musical notation draw into WebDriver dictation). But like any Appium playscript, this could feature been written in any language. First of all, let & # x27; s look at the independent function: You can forthwith see that this isn & # x27; t a proper tryout, just an automation playscript (there & # x27; s no test method or affirmation, just complain old JS use). We firstly connect to the Appium Raspberry Pi driver running on the Pi at its default port of 4774 (this is where it was important to start the driver with a non-default reference, so that connecting to it over Ethernet works). Then, we pass in our app definition (as establish above). Finally, we impute names to our different pin elements, and then call a usance playSong method which directs the client to post the right signals at the correct time based on what is defined in song. The implementation of playSong isn & # x27; t crucial to show here, but what is important is that somewhere inside that method are a bunch of calls to another method hit, which execute the actual employment: You can see here that there & # x27; s really no magic imply: we just turn a pin & # x27; s signal off and on in order to emulate the act of weigh a button on a device. (If you & # x27; re disconcert, like I was, why we have to become the signaloffin order to trigger a drum hit, it appear to be because that & # x27; s how the button is designed -- when it is urge down, itbreaksthe tour, so that is how I program the CPX to recognize a drum hit. Therefore we have to follow the same pattern with our test logic, and that is why the initial state of all the pins was set to 1). There you go! As I said above, this is genuinely solely half of a true test, since there is no substantiation involved, but it does show how, with a little bit of imagination and creativeness, the Appium framework can be repurposed for applicationsverydifferent from traditional screen-based UI apps. The Appium Raspberry Pi driver is available for you to use nonetheless you wish. In fact, the Raspberry Pi is probably overkill for the design of simply driving electric signals to a device under test. Something like one of the little Arduinos would probably be more appropriate -- -I just happened to have a Pi on hand! If you want to see my total trial hand in the context of a unhurt project, you can find iton GitHub. Please let me know if you regain any interesting exercise for this approach, or end up do something alike for your own IoT devices! Lead, Content Marketing, HeadSpin Inc. Piali is a active and results-driven Content Marketing Specialist with 8+ years of experience in crafting occupy narratives and marketing collateral across diverse manufacture. She excels in collaborating with cross-functional teams to develop advanced content scheme and deliver compelling, authentic, and impactful content that vibrate with target audiences and enhances brand authenticity. Upload your APK or URL. SUSA explores like 10 real users — finds bugs, accessibility violations, and security issues. No scripts needed. Upload your APK or URL. SUSA explores like 10 real users — finds bugs, accessibility violations, and security issues. No scripts.


.png)


Automating Custom IoT Devices With Appium - Part 2
AI-Powered Key Takeaways

git clon https: //github.com/jlipps/appium-raspi-driver.git cd appium-raspi-driver npm install # now begin the driver in standalone mode node. -a raspberrypi.local{pins: {'P1-7 ': {id: 'A1 ', mode: 'output ', init: 1,}, 'P1-11 ': {id: 'A2 ', mode: 'output ', init: 1,}, 'P1-13 ': {id: 'A5 ', mode: 'output ', init: 1,}, 'P1-15 ': {id: 'A6 ', mode: 'output ', init: 1,},}}const kick = await driver.elementById (`` A1 '');await kick.sendKeys (`` 0 '')(async function main () {driver = wd ('http: //raspberrypi.local:7774/wd/hub '); await driver.init ({app}); await B.delay (2000); try {const kick = await driver.elementById (`` A1 ''); const snare = await driver.elementById (`` A2 ''); const hat = wait driver.elementById (`` A5 ''); const tom = await driver.elementById (`` A6 ''); const elMap = {k: kick, s: trap, h: hat, t: tom}; const vocal = ` k4 k4 s8 k4 k8 k4 k4 s8 k8 s8 s8 h4 k4 s8 k4 k8 k4 k4 s8 k8 t8 t8 h4 `; await playSong (song, elMap);} finally {await driver.quit ();}}) () .catch (console.error);async map hit (el, delay=HIT_HOLD_MS) {await el.sendKeys (`` 0 ''); await B.delay (delay); await el.sendKeys (`` 1 '');}Jonathan Lipps

![]()
Piali Mazumdar

![]()
Automating Custom IoT Devices With Appium - Part 2
4 Parts
-1280X720-Final-2.jpg)
Regression Intelligence practical guide for advanced users (Part 3)
Regression Intelligence practical guidebook for modern users (Part 4)
Discover how HeadSpin can authorise your occupation with superior testing capabilities
![]()
![]()
![]()
![]()
![]()
![]()
![]()
![]()


![]()
![]()

Discover how HeadSpin can empower your occupation with superior testing capabilities
![]()
![]()
![]()
![]()
![]()
![]()
Discover how HeadSpin can empower your occupation with superior testing capabilities
![]()
![]()
![]()
![]()
![]()
![]()
Connet Now


![]()
![]()
![]()
![]()
![]()
![]()
![]()
Automate This With SUSA
Test Your App Autonomously


.png)