Capturing Android Emulator Network Traffic with Appium
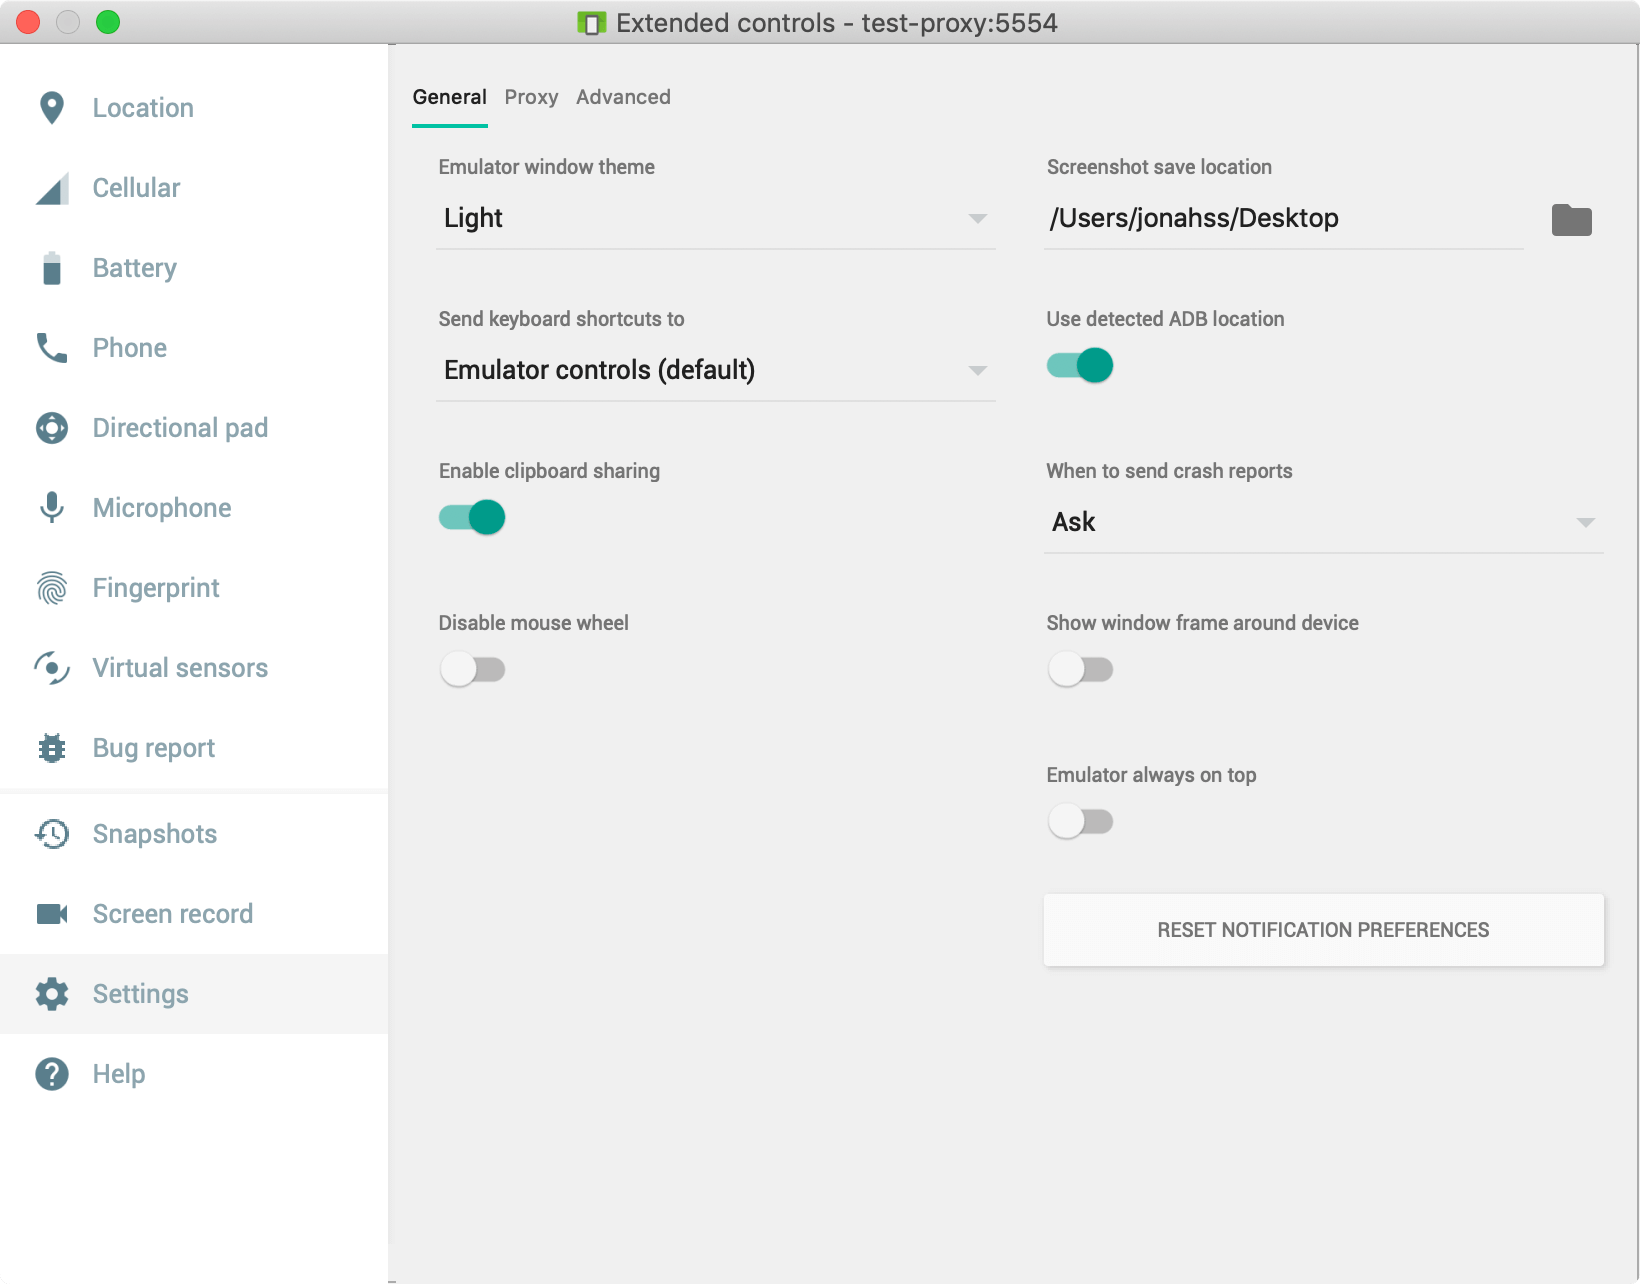
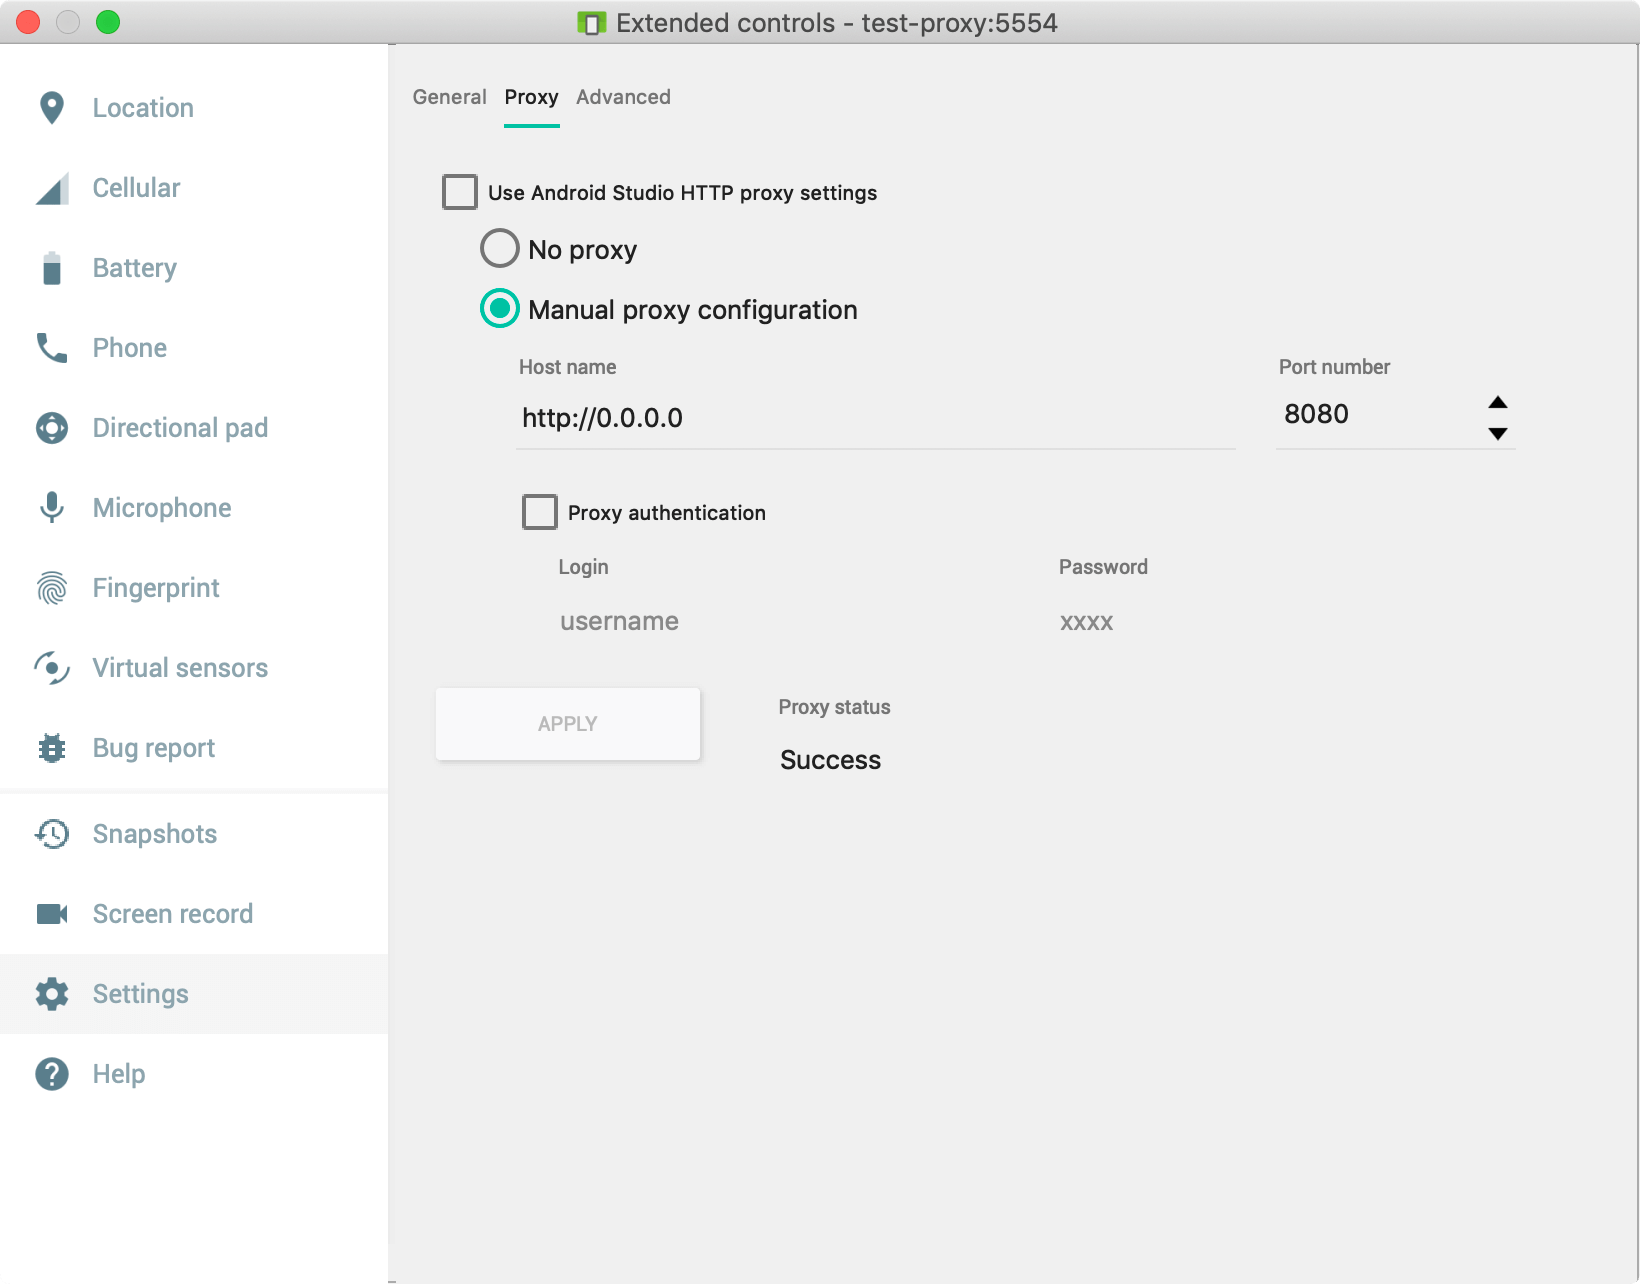
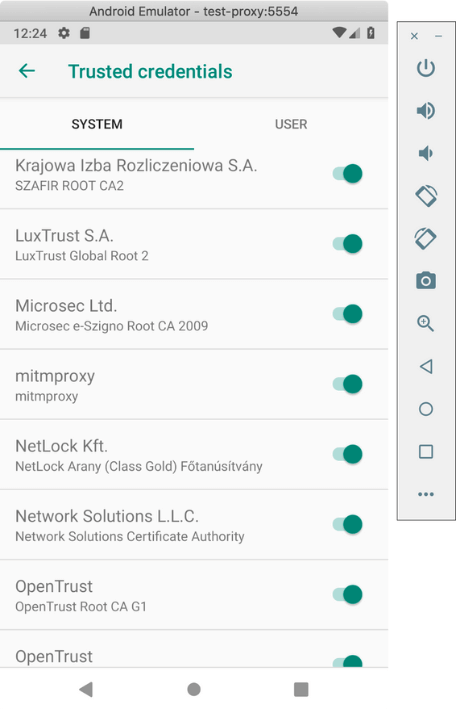
Terminal week, we covered how to within an Appium test. This week, we & # x27; ll do the same thing with Android Emulators. A abbreviated recap from last week: We can begin a man-in-the-middle proxy calledmitmproxy which will capture all the net traffic from the emulator and let us access the requests and responses from our trial script. We can then do innovative assertion in our trial, create sure that the app is send requests to early services as ask. We can also modify the responses, forcing the app into states we dictate, for quiz purpose. For more details on proxies and why I choose mitmproxy, read the previous article. As with last workweek, the example code is compose in Javascript. I hope to announce a convenient way to in a succeeding clause. Mitmproxy can be establish and run on Windows from within the Windows Subsystem for Linux (WSL). These didactics are for MacOS but should work the same from WSL. Install mitmproxy. You may postulate to create sure you have Python3 andpip3 installed firstly. Installing this way is required for the Javascript library we will be using subsequently. And then run it: The proxy runs on localhostport 8080 by default. The empty pane it displays should fill up with network traffic once we configure our simulator to point to it. have a built-in setting for configuring HTTP and HTTPS proxies. Start an imitator and open the aper settings acid (not the Settings app inside the emulator). Click on theSettings tab on the remaining side, then the gussetProxy tab on top. Set a & quot; Manual Proxy Configuration & quot; with host genshttp: //0.0.0.0 and port 8080. Now the emulator will try to forward all traffic through mitmproxy which we are running on the same porthole. To sustain that things are set up so far, open a web browser on the emulator and try to laden https: //appiumpro.com, the page should not load! The reason it do not load is because mitmproxy is intercepting the petition and forwarding the answer, but this situation habituate HTTPS and mitmproxy signs each reaction with the special mitmproxy certificate. By default, our emulator make not trust the mitmproxy certificate, and refuses to load the page. The succeeding pace is to install and trust the mitmproxy certificate. This is where things get a little knavish. Most of the guidebook you & # x27; ll find online for how to set up a proxy for Android emulators will but act on Android variant 6 and low. Android variation 7, & quot; Nougat & quot;, introduced hard-and-fast protection normal when it comes to establish SSL certificates. If you were to navigate to the special url hosted by mitmproxy:mitm.it and follow the didactics there for installing and trusting the mitmproxy credential, this would only fix the web browsers on the device. You could laden https: //appiumpro.com in the browser, but HTTPS postulation which originate from inside native apps would still be blocked. This is because the device proceed two lists of trusted certificates: user certificates and system credentials. Installing a credential through the UI set it into the user credential inclination, but only certificates in the system list are trusted for app-based network requests. So now we need to add the mitmproxy certificate to the scheme certificate listing. This can only be make with root access to the device, which we feature with our emulators. This process should also work on real devices that have been rooted, but you may need to observe a different set of commands which works on your particular gimmick. These direction should work on most newer emulators. A silver liner to this operation is that installing a user certificate requires enabling the device & # x27; s lock blind but this method of establish a scheme certificate allows us to keep the lock screen disabled. From the commandline, do the following: First, launch the emulator with the -writable-systemflag. This will allow us to compose to the system files of the device. My AVD is namedtest-proxy.You & # x27; ll experience to insert the name of your emulator here. Pro tip: Tools like SUSA can handle this autonomously — upload your app and get results without writing a single test script. That should boot up the copycat. Once booted, we unlock the device further: Let & # x27; s now find our certificate file and push it to the device. The first clip we ran mitmproxy, it saved its certificates to the home directory. Let & # x27; s save that to a variable to use later. We also need to get a special hash to identify the certificate. The filename of the certification on the emulator take to be set as the hash of the certificate. If you don & # x27; t have openssl installed on your computer, you can chouse and just use the valuec8750f0d. The mitmproxy certificate is the like for everybody, so unless they change it in a later variant, this should be fine. Ok, now we install it on the device: And let & # x27; s conduct adb back out of stem mode, because I & # x27; ve found that the emulators tend to crash when restarting or lose the mitmproxy credential unless you take this pace: That & # x27; s it. https: //appiumpro.com should load successfully on the device & # x27; s browser with mitmproxy running. Requests made by native apps will be logged by the proxy as well. Take a expression at the terminal where mitmproxy is running and you should see requests being log there when you perform actions on the emulator (arrow key scroll the mitmproxy UI). Just to duplicate chit ourselves, we can site the mitmproxy certification in the list of system-trusted credentials. On the device, open the settings app, choose & quot; Security & amp; Location & quot; - & gt; Advanced- & gt; & quot; Encryption and Credentials & quot; - & gt; & quot; Trusted Credentials & quot;. Scroll down way past all the default certificate and chance one named & quot; mitmproxy & quot; (they & # x27; re in alphabetical order). Note the tabs at the top which differentiate between the & quot; scheme & quot; certificates and the & quot; user & quot; security. If we see it there, we & # x27; re ready to run our test scripts. For new aper, the stairs above want to be repeated. If you want to automatize set the device proxy, this can be done by adding a-http-proxyargument to the dictation for starting the copycat: I also ground that if you & # x27; re really stuck, you can add the-debug-proxyflag and the emulator will log information about the proxy it is using: There is apull postulationin progress to add a new desired capability to Appium which would mechanically install the certification to the device. Then most the steps here could be skipped! Appium already has theavdArgs hope capability, which can be utilise to legislate the-http-proxysetting when starting the aper. The exemplar code for capturing Android emulator network traffic is almost monovular to the iOS instance. The only difference besides the necessary changes to desire capabilities, is that Android emulator seem to send asking forthwith to an IP address rather than a host name. Our App & # x27; scodemakes a request tohttps: //history.muffinlabs.com/date/1/1but mitmproxy captures a packet with the address:https: //69.163.152.183/date/1/1. This is valid conduct, but early man-in-the-middle proxies (such as BrowserMob Proxy) can not manage traffic like this. Let & # x27; s insert codification to start mitmproxy before our test, then filter and access the captured traffic so we can do assertions on it. There are a couple different approaching to this. What I really need is the power to programmatically start mitmproxy and access the requests within my test. Mitmproxy is designed with a nicely featured addon framework which supports plugins indite in Python. The way the designers expects you to run mitmproxy is as a standalone service, and pass python script files to it using the-scommandline flag. We could write a python addon and start/stop the placeholder as a separate shell process, but I require to avoid that if I can. Instead, I found aoutstanding little Node.js modulewhich starts mitmproxy as a separate process and loads a special Python addon which opens a websocket connection so that we can get information in our Javascript code while the placeholder is running. The undermentioned test opens our usual demo app,TheApp, opens our pickerwheel demo, and tap the push. This activeness results in the app sending a request tohistory.muffinlabs.comwhich returns some historic events for the app to display. The test starts mitmproxy and logs all requests direct by the app to an raiment. At the end of the test, we control that the request we expected the app to mail was so sent. Mitmproxy allows us to get even more apt. Just vary a couple lines in the test above, we can intercept the app & # x27; s petition tohistory.muffinlabs.comand rewrite the message of the answer to contain the data of our choosing. This can be useful in getting the app into a predictable province. The current codification take a random historic case to display every time, but we can respond with a individual event of our choosing and force the app to display what we want. We can also force the UI to display specific values, so we can test long strings, negative numbers, error states, etc, without hold to really set up the necessary context on the backend. All this can be done from the test playscript! That & # x27; s all for this week.Sample code is on github, as common. Lead, Content Marketing, HeadSpin Inc. Piali is a dynamic and results-driven Content Marketing Specialist with 8+ years of experience in crafting engaging narratives and marketing collateral across diverse industries. She excels in collaborate with cross-functional teams to evolve innovative content scheme and deliver compelling, authentic, and impactful content that resonate with target audiences and enhances brand authenticity. Upload your APK or URL. SUSA explores like 10 real users — finds bugs, accessibility violations, and security issues. No scripts needed. Upload your APK or URL. SUSA explores like 10 real users — finds bugs, accessibility violations, and security issues. No scripts.


.png)


Capturing Android Emulator Network Traffic with Appium
AI-Powered Key Takeaways
Setting up mitmproxy for Android emulators
sudo pip3 install mitmproxy
mitmproxy
Connect to our real local device worldwide and run geolocation tests on your mobile apps and websites..
Read:
Check out:
Don ’ t Rely on iOS Emulators & amp; Android Simulators.
emulator -avd test-proxy -writable-system &adb root adb remountTest your mobile apps on existent devices in 50+ locations worldwide..
ca=~/.mitmproxy/mitmproxy-ca-cert.pemhash= $ (openssl x509 -noout -subject_hash_old -in $ ca)Check out:
hash=c8750f0dadb pushing $ ca /system/etc/security/cacerts/ $ hash.0Also assay:
adb unrootAlso check:
Enable distributed and crowdsourced essay with secure low-latency access to your remote devices..
Automating Certificate Installation
emulator -avd test-proxy -http-proxy http: //0.0.0.0:8082emulator -avd test-proxy -debug-proxy -http-proxy http: //0.0.0.0:8082Capturing Traffic Within a Node.js Test Script
let test = require ('ava ') let fs = require ('fs-extra ') let os = require ('os ') let path = require ('path ') let {remote} = require ('webdriverio ') let Mitmproxy = require ('mitmproxy ') .default let procurator, driver let interceptedMessages = [] // this function will get phone every time the placeholder intercepts a asking let requestHandler = (content) = > {let req = message.request console.log (' * * * * * * * * * * * * * * * * * * * * * * * * * * * * * * * * * * * * ') console.log ('mitmproxy intercepted a asking ') console.log (req.method) console.log (req.rawUrl) console.log (message.requestBody.toString ()) console.log (' * * * * * * * * * * * * * * * * * * * * * * * * * * * * * * * * * * * * ') interceptedMessages.push (message)} test.before (async t = > {// showtime mitmproxy proxy = await Mitmproxy.Create (requestHandler, [], true, true) driver = await remote ({hostname: 'localhost ', port: 4723, path: '/wd/hub ', capabilities: {platformName: 'Android ', platformVersion: ' 9 ', deviceName: 'test-proxy ', automationName: 'UiAutomator2 ', app: '/Users/jonahss/Workspace/TheApp-v1.9.0.apk ', //'https: //github.com/cloudgrey-io/the-app/releases/download/v1.9.0/TheApp-v1.9.0.apk ',}, logLevel: 'silent'})}) exam ('getting the event for a day, via request to history.muffinlabs.com ', async t = > {let pickerDemo = await driver. $ ('~Picker Demo ') await pickerDemo.click () let push = await driver. $ ('~learnMore ') wait button.click () // wait for alert let alertIsPresent = async () = > {try {return await driver.getAlertText ();} catch {homecoming false;}} await driver.waitUntil (alertIsPresent, 4000) await driver.dismissAlert () t.true (interceptedMessages.length > 0) t.true (interceptedMessages.some (m = > /https: \/\/. * \/date\/1\/1/.test (m.request.rawUrl)))}) test.after.always (async t = > {t.log ('shutting down ') await proxy.shutdown () wait driver.deleteSession ()})Check out:
Modifying Network Responses Recieved By The Device
let test = require ('ava ') let {remote} = require ('webdriverio ') let Mitmproxy = require ('mitmproxy ') .default let proxy, driver let interceptedMessages = [] // this is the response we will regress from our proxy, instead of what the site unremarkably returns let injectedResponse = {date: `` January 1 '', url: `` https: //wikipedia.org/wiki/January_1 '', datum: {Events: [{year: `` 2019 '', textbook: `` Tests Passed '',}]}} let requestHandler = (message) = > {message.setResponseBody (Buffer.from (JSON.stringify (injectedResponse), 'utf8 '))} test.before (async t = > {proxy = await Mitmproxy.Create (requestHandler, [], true, true) driver = await remote ({hostname: 'localhost ', port: 4723, path: '/wd/hub ', capabilities: {platformName: 'Android ', platformVersion: ' 9 ', deviceName: 'test-proxy ', automationName: 'UiAutomator2 ', app: 'https: //github.com/cloudgrey-io/the-app/releases/download/v1.9.0/TheApp-v1.9.0.apk ',}, logLevel: 'silent'})}) test (` insert our own case for a day, assert that it 's displayed `, async t = > {let pickerDemo = await driver. $ ('~Picker Demo ') await pickerDemo.click () let push = await driver. $ ('~learnMore ') await button.click () // wait for awake let alertIsPresent = async () = > {try {return await driver.getAlertText ();} catch {return faithlessly;}} await driver.waitUntil (alertIsPresent, 4000) let alertText = await driver.getAlertText () await driver.dismissAlert () // assert that the alertText is the same as the package we shoot t.true (/Tests Passed/.test (alertText))}) test.after.always (async t = > {t.log ('shutting down ') wait proxy.shutdown () wait driver.deleteSession ()})Jonathan Lipps

![]()
Piali Mazumdar

![]()
Capturing Android Emulator Network Traffic with Appium
4 Parts
-1280X720-Final-2.jpg)
Regression Intelligence practical guide for advanced user (Part 3)
Regression Intelligence practical usher for advanced users (Part 4)
Discover how HeadSpin can authorise your business with superior testing capabilities
![]()
![]()
![]()
![]()
![]()
![]()
![]()
![]()


![]()
![]()

Discover how HeadSpin can empower your business with superior testing capabilities
![]()
![]()
![]()
![]()
![]()
![]()
Discover how HeadSpin can authorize your business with superior testing capabilities
![]()
![]()
![]()
![]()
![]()
![]()
Connet Now


![]()
![]()
![]()
![]()
![]()
![]()
![]()
Automate This With SUSA
Test Your App Autonomously


.png)